
The ceremony is over. You’ve married the love of your life. The sun has set below the horizon. How do you cap off such a perfect night? Answer: sparklers. Not only is a sparkler send-off the perfect way to say goodbye to the newlyweds, it’s a great way to capture magical moments at night.
Possibilities are endless — sparkler tunnels, portraits, written words — especially when working with a photographer with low-light experience.
These eight tips are for couples planning to incorporate sparklers into their wedding day plans.
Note: If you’re a photographer looking for photo advice on how to get amazing sparkler photos, check out my sister post: 4 Simple Photography Techniques for Amazing Wedding Sparkler Photos!
Tip 1: Purchase Premium Sparklers
Choosing the best sparklers for your photos will guarantee better results. Those short, paper-wrapped sparklers you can buy in stores around the Fourth of July? Those don’t work as well. First, they produce a lot of smoke; second, they’re short-lived (about 10-15 seconds, which is sometimes how long it takes to get everything started in a long sparkler tunnel).
I recommend 36″ sparklers for portraits and send-offs. At that length, they last about 3.5 minutes before burning out — it’s a perfect amount of time to get everyone’s sparklers lit, and you get to go through your send off a couple times! If you’re doing couples portraits with your sparklers, the longer sparklers also provide ample time for a few different poses and looks.
Tip 2: Check Sunset Timing on Your Wedding Day
Wedding schedules usually have a fair amount of flexibility, but there’s one thing on your day that can’t be changed — sunset time. Make sure you know what time the sun sets on your day, at your specific location (this is a great free site).
For send-offs, sparklers look good starting at dusk (about 10-15 minutes after sundown) and later into the evening. For portraits where words or images are drawn with sparklers, plan for at least an hour after sunset to get the best results. If it’s not dark enough, your photos won’t be clear.

Tip 3: Make Sure Your Venue Allows Sparklers
Not all venues allow sparklers on their property. Other venues allow sparkler photos, but not necessarily send offs for 100+ people. Make sure you check the contract with your venue coordinator on what’s allowed — and as a courtesy, if sparklers are allowed, let your coordinator know the details of your sparkler photo plans.

Tip 4: Purchase Enough Sparklers!
I recommend you plan for at least one sparkler for each guest. If you’re having a smaller celebration, plan for two sparklers per guest (it really adds to the oomph of the photos). If you’re planning to do the photos after the dance has started, but before you actually leave for the evening, you’ll likely have most of your guests there. If you plan on doing your send-off late into the evening, it’s likely you won’t have all of your guests in attendance, and could plan to purchase fewer sparklers.

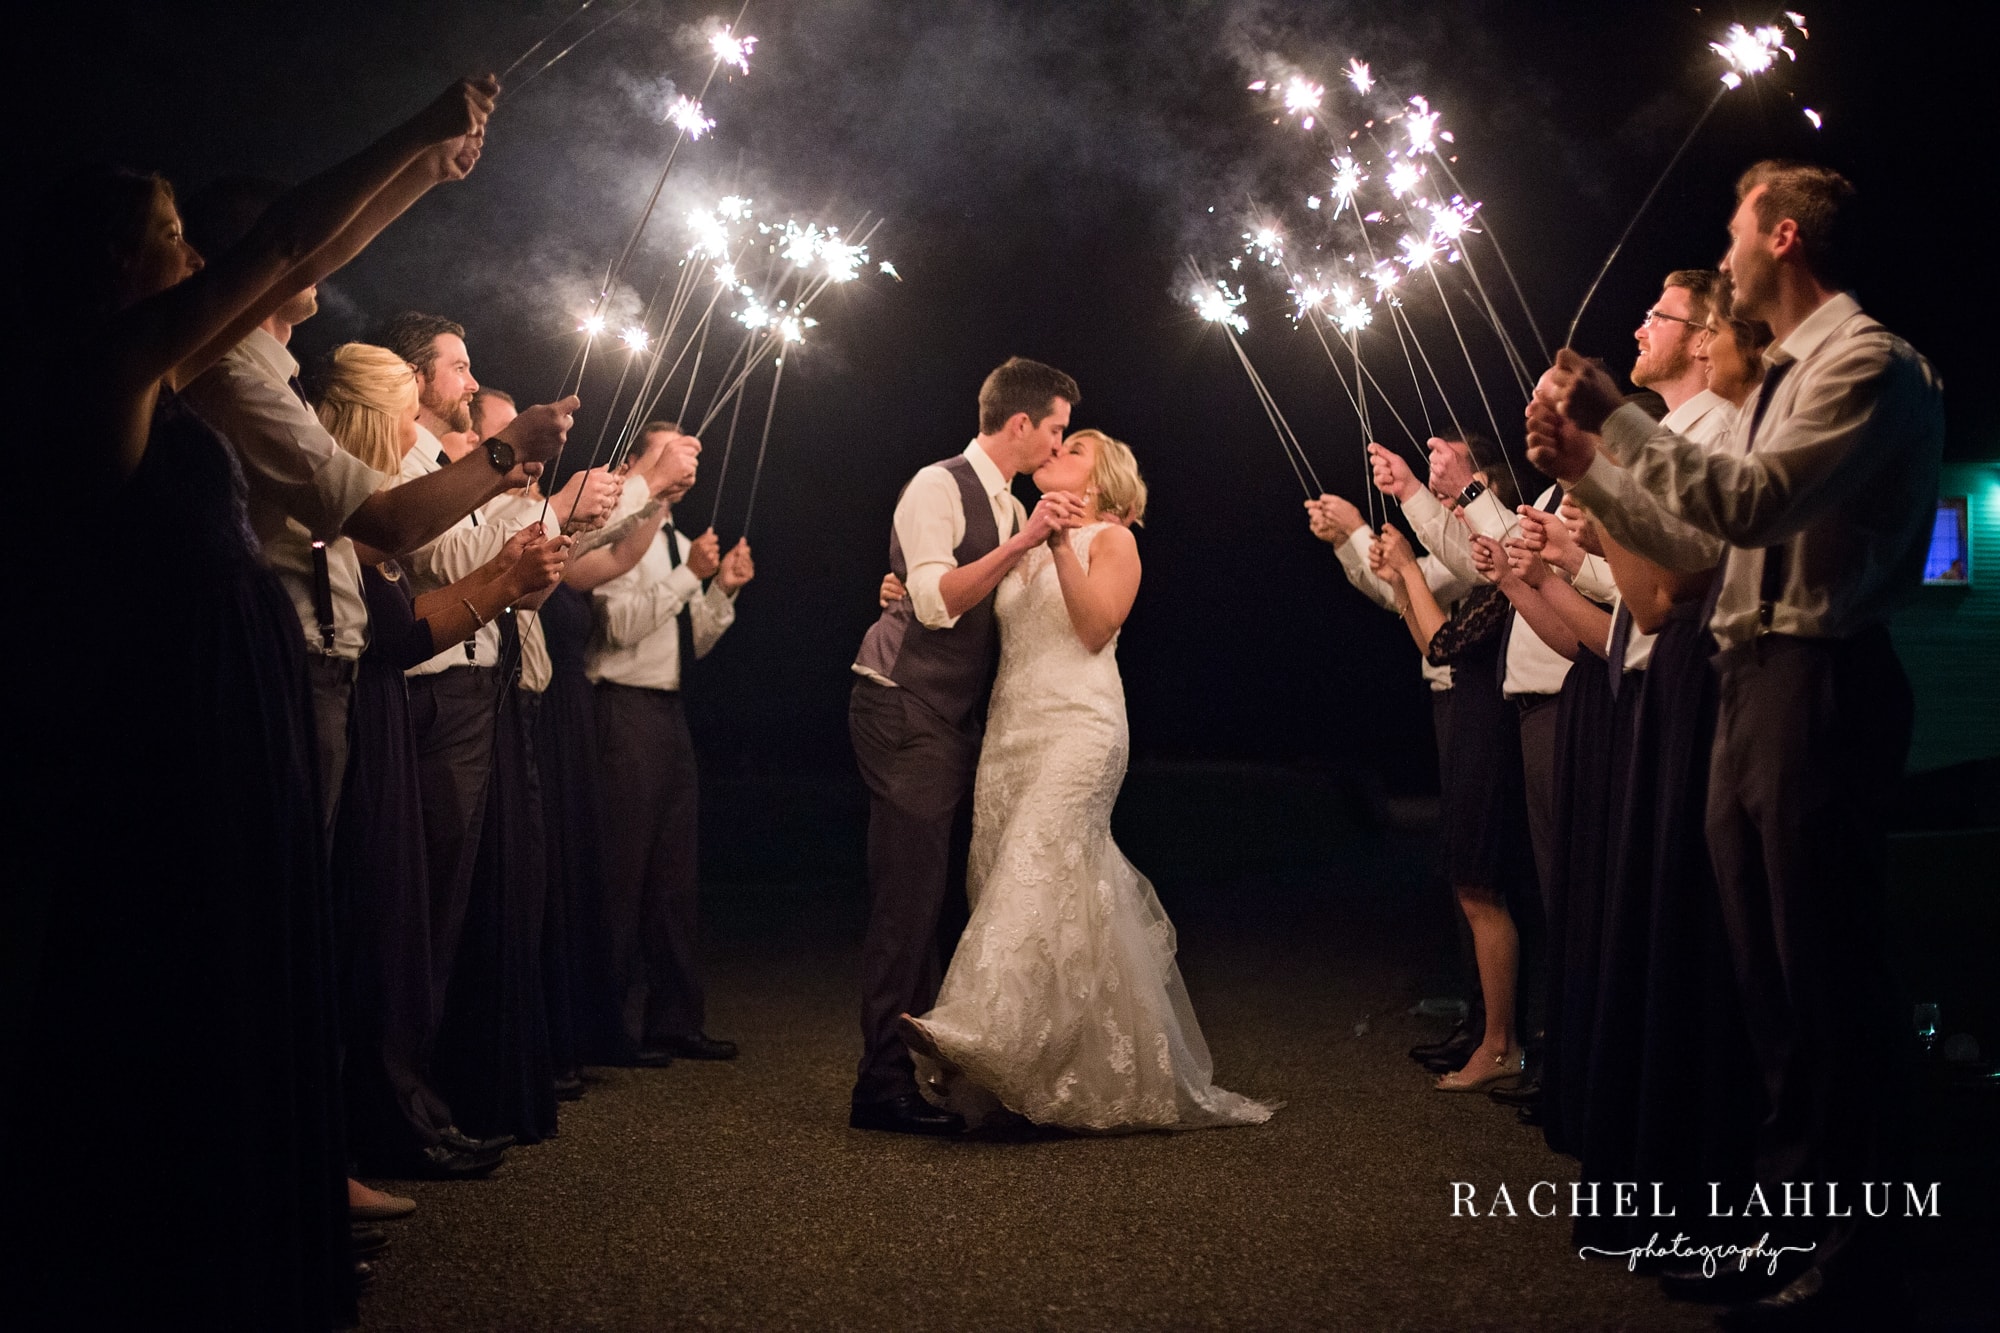
Tip 5: Walk Through Your Send-Off Tunnel at Least Twice!
If you plan on walking through a tunnel of sparklers, you can walk through it two (or more times!). Stop halfway through the tunnel each time, and hold a different pose for your photographer to capture. Here are a few of my favorites:
- Stop for a Kiss! (Go big and dramatic, or sweet and intimate)
- A Sweet Smile, followed by a cheer!
- Piggyback or Carry (give your partner a piggy back, or carry them through the tunnel)
- A Dress Twirl
- Run! 🙂


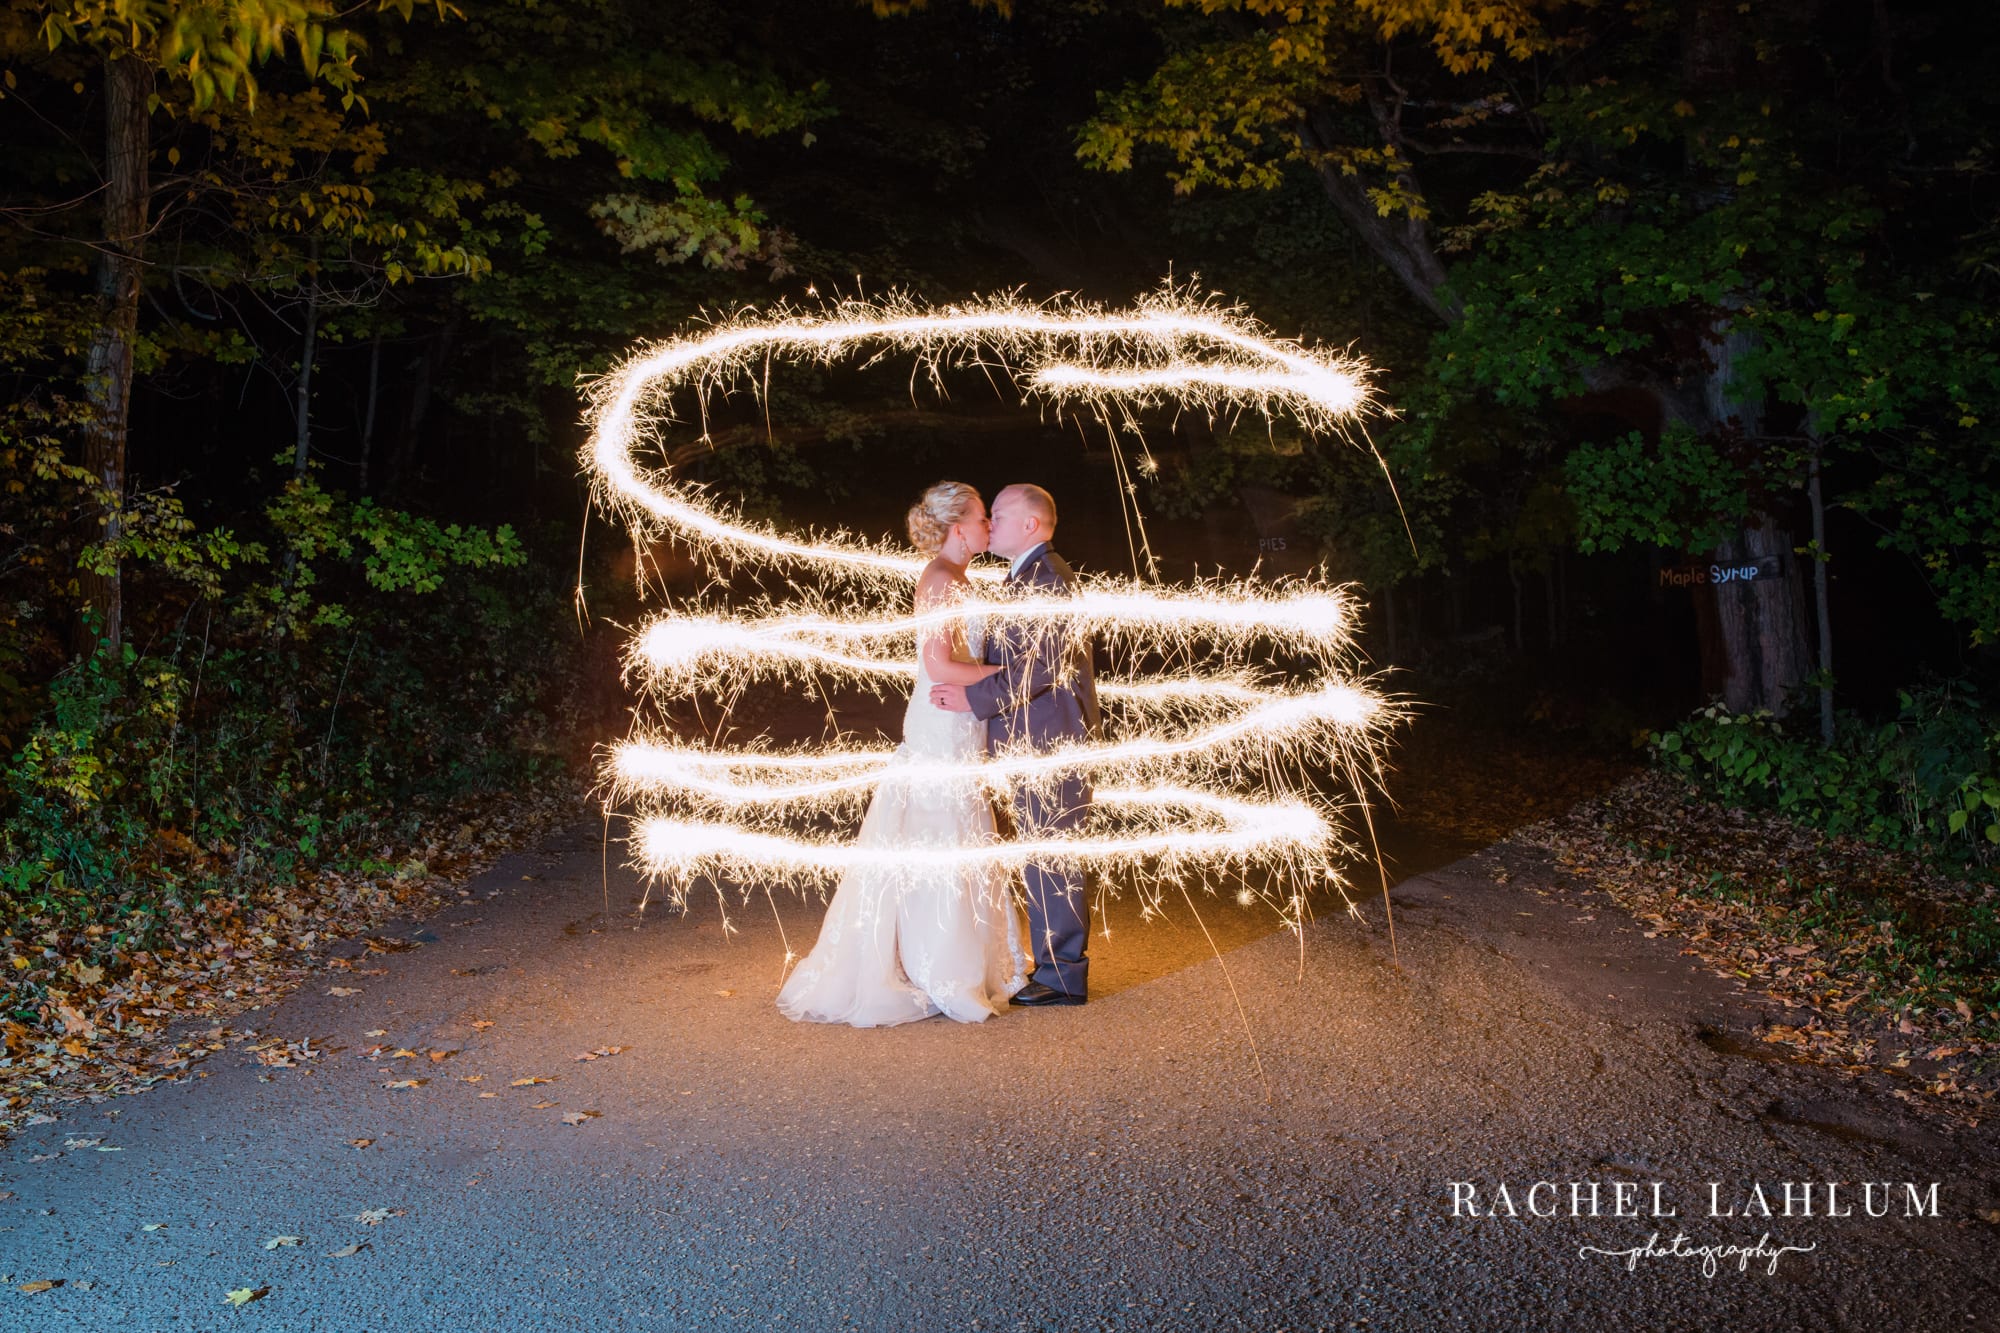
Tip 6: Set Aside Ten Minutes for Couples Sparkler Portraits
Before your send-off, set aside 10 minutes for sparkler portraits. There are so many fun things you can plan, especially when using long exposure painting with light techniques. The possibilities are limitless!


Tip 7: There Are A Few Ways to Build Sparkler Photos Into Your Schedule
As alluded above, there are a few different ways you could build sparkler photos into your wedding photography schedule.
End of the Evening: This is a true send-off, at the very end of your reception. As mentioned above, if you plan a true send-off, it’s likely not all of your guests will still be in attendance, and you could save a few dollars by trimming the amount of sparklers you purchase (or, you could buy one for every guest, but give some guests two, so that everything is used).
During the Dance (with everyone): If it’s important to get everyone in attendance in your sparkler photos, you’ll want to plan it for earlier in the evening (sometime after your dance has started, but before it gets too late into the evening). This route is great for photos, but make sure you have a plan with your DJ when you return. I like to suggest returning to the dance afterwards with a reception game (like the Shoe Game), a dollar dance, a bouquet toss, or even a group photo on the dance floor. This way, we won’t “kill the vibe” by bringing everyone outside.
During the Dance (with a handful of friends): If you want the send off look, but don’t want to pull everyone outside, grab your wedding party or a dozen of your friends/family outside for the send off photos. Give everyone two sparklers for these photos.

Tip 8: Don’t Forget Lighters and Buckets!
The premium sparklers tend to be magnesium-coated, meaning once they’re lit, they won’t easily burn out. However, it can take awhile to get them ignited. Lighters with a constant flame (such as a candle lighter or a Zippo) will be much better than matches. (In a pinch, you can always grab a candle from a reception table too).
Proper extinguishing and disposal is important too! If you’re able, coordinate a bucket of water to ensure the sparklers are properly extinguished before they’re thrown in the trash.
Planning a wedding? Let’s chat photography!
Rachel Lahlum is an award-winning Minneapolis wedding photographer with experience in hundreds of weddings and engagement sessions. She takes a guided approach towards working with couples, from helping with planning and scheduling, to guiding with poses and prompts during the session. Her photography is crisp, clean and bright, with true-to-life colors and a mix of traditional poses and candid moments.