
 As a teacher, I find myself needing quick little presents for people throughout the year. But a teacher’s salary doesn’t allow me to be too extravagant in my gift giving. A zippered pouch is a win-win situation in my book. It uses up leftover fabric, it’s quick, and can be used for so many things. Everyone needs a good zippered pouch.
If you have a spare afternoon , you could make several pouches to have on hand. Fill them with candy, gifts cards, pop money, hand sanitizer, lip balm, travel sized lotions, or just give them empty. Your friends will love them especially if it’s hand made by you.

You will need:

Of course, you could go buy a zipper, but check out your refashion stash. You might be surprised where you can find some. Old worn out thrift store purses are an excellent source for zippers. In this case, I had an old pair of snowboard pants that Cooper had outgrown. The pants were originally a thrift store purchase so he really got his money’s worth out of them. He wore them for several years but they were now stained and ripped in a few places. I didn’t think it was something even my thrift store would want now, so instead of just throwing them away, I’m dissecting them for the zippers. And let me tell you, there are zippers all over these pants.

OK, let’s get started:


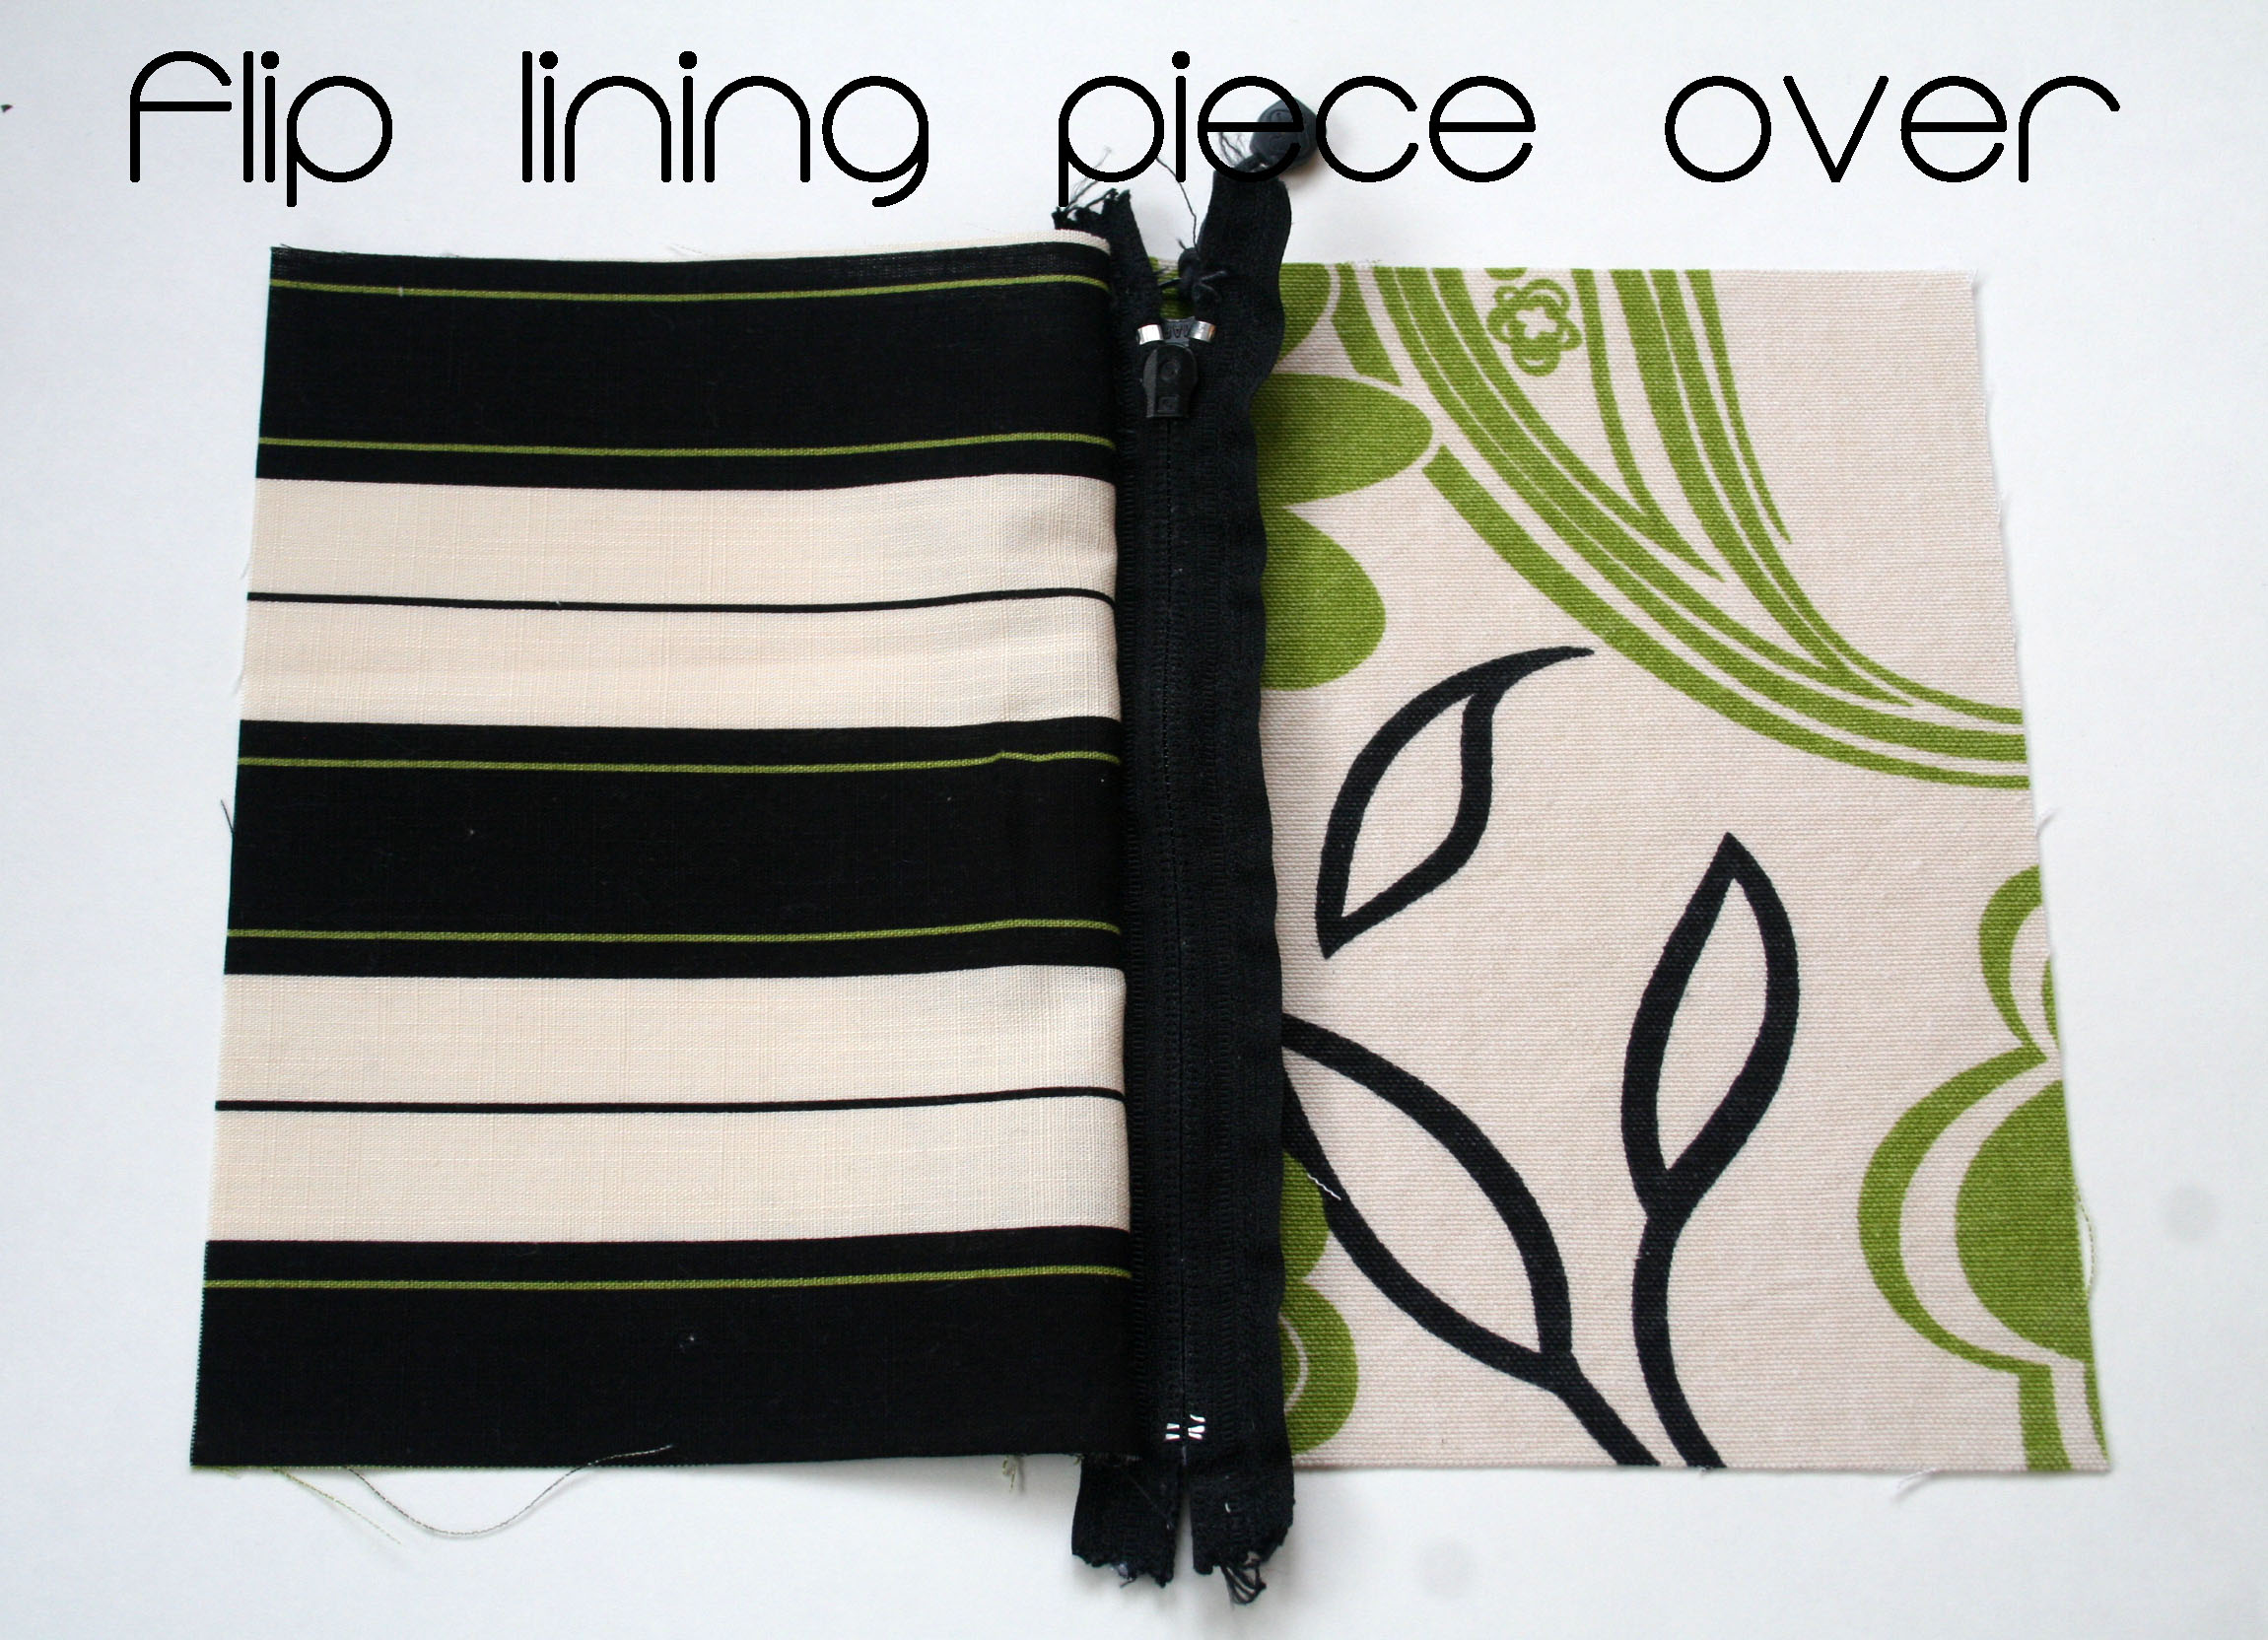


Press with an iron being careful not to melt your zipper if it’s nylon.

Be sure zipper is open before you start the next step.


And now without much expense or time invested, you’ve got a cute little gift for a friend. Have fun and if you make one, I’d love to see it.
You might also like:

And don’t for get to check out Being Zhenya‘s beautiful earring givaway. You only have until March 8th to enter.


Or since it’s soo cute… you could just keep it! LoL 😉
The thought did cross my mind! 🙂
So cute. Love the fabric. The bead is a perfect touch.
Thanks so much!!! This is some of my favorite fabric, too.
Great pictures and tutorial. I’ve been scared of zippers my whole life, but somehow this gives me the feeling I should face my fears head on and make some awesome bags! Thanks for the inspiration!
Thanks, Amy Jo! No need to be afraid of zippers. I bet if you try this easy bag, you’ll never look at a zipper the same again. Good luck and Happy sewing!
Beth
Thank you SO much for this. My craft group is making items to give to a women’s shelter, our choice of item to fit our interests and skills, and I was thinking of sewing cosmetic bags. But all the tutorials I was finding had too many pieces and were difficult to follow. This looks perfect. Oh, thank you again!
You are so welcome, Jo! Sounds like your craft group is a great group of people. How nice to make things for a women’s shelter. This bag would be perfect for cosmetics and you could make it any size you’d like. Have fun!
Beth
This is a wonderful tutorial! I always have leftover fabric and this is a great way to make use of it! Thank you so much!
You are so welcome, Sandy. It’s always fun to have something quick, easy and free 🙂 to make in between larger projects. I hope you get a chance to try making one.
Beth
This is the best tutorial I found and can not wait to try it , it look so simple and yet the result is so adorable!!
Thanks, it IS easy. As a matter of fact, I’m spending the afternoon making pouches. I’m now on my fourth one. Each one goes faster. I think it takes me longer to make my fabric choices than it does to actually make the pouch. It’s a fun way to use up some scraps.
Have fun!
Beth
I’m lovin’ it! Who doesn’t have extra stash to use up? Cool!
No kidding! I bet I could go at least a couple of years without buying any new fabric and still have plenty to do.
Enjoy your Sunday!
Beth
Pouches and totes in my sewing room are like pots and pans in my kitchen – I am fascinated by them, seek them out at thrift stores and buy way too many. But there’s an advantage to pouches and totes. I can get patterns and make them, give them away and keep looking for more to make. This one is DEFINITELY on my list of things to make this spring for my friends and rellies. Thanks for sharing it!
You are so welcome, Pat! I do love making totes and pouches, too. It’s a nice change once in awhile to make one because its pretty straight forward and it seems to recharge my refashion batteries. I’m off to refashion a skirt, now. Happy sewing!
Beth
I love the little bead. Terrific touch!
Thanks, Ann. I just made a blue Ikat pouch from some upholstery samples and I have a cute little blue glass turtle bead for it. I might just have to post it. 🙂
Beth
I love the graphic print! It looks so pretty and you make it look so easy!
Thanks, Kelli! I’ve got so many pretty fabric swatches. I want to make a pouch from every one. I made seven of them yesterday afternoon. It’s Classified Employees Appreciation Week and I’ve got loads of people to thank.
Have a great week!
Beth
What a great gift idea and a great tutorial! This would be perfect as a coin purse or makeup bag. Love!
Thanks! I made seven pouches yesterday afternoon. Once you make one, the rest go pretty quickly. I need to get some more more fusible interfacing so I can make some from my cotton stash. So many pretty colors. Warning: This project could become addicting! 🙂
You’ve done it again! Sew clever!
Thanks, Leilani!
Reblogged this on Sew Vintage Emporium and commented:
Omg this such an easy way of doing it!!
Thanks!!
I went crazy making these a few months ago…after I figured out how the lining worked. Your instructions are great. I guess I’ll be getting out my sewing machine tomorrow. Thanks for the inspiration.
I love to sew things like this, too. Very satisfying and doesn’t take much thought once you make one or two. As a matter of fact, I’m going to make a few more tonight. 🙂
Here’s to Pouch Making!
Beth
Love the little bauble and the color choices. Easy peasy project.
Yep, Easy Peasy and Fun! 🙂
Reblogged this on Little Tidbits of Teresa's Life and commented:
I have been meaning to make a tutorial on making a pouch but a fellow blogger has just made a great one so there is no need! I am reblogging from The Renegade Seamstress. This is a great way to make a zippered pouch and The Renegade Seamstress made an adorable pouch in her sample!
Thank you, Teresa!
Pingback: Sewing Adventure: Second Attempt at a Zippered Pouch | Find Joy
awesome tutorial!Thank you so much!!!
You are so welcome!
Yay! I just stumbled across this blog today and have fallen in love with everything I see! Finding this tutorial is perfect because I was about to go buy a new makeup bag. Now I realize how easy it will be to make my own. Thank you so much for sharing your genius with everyone! Off to my leftover fabric stash…
Hi Josie,
Welcome to The Renegade Seamstress. Have fun making this, it’s a quick and easy, satisfying project. I’d love to see pictures of your pouch when you finish!!
Beth
I made zippered bags, but always started with the bag and finished with the zipper and that was not an easy way. Now you gave me the right solution to start with the zipper, thats perfect!!!!!!! Now I can make my tote bags with zipper much easier. Thanks a lot for this superb idea. I will start right this afternoon.
You are so welcome, Hester.
Have fun!
Beth
I am an Esthetician and I have been looking for a small pouch to put my tweezers in and I just made a smaller version of this with some fusable fleece to make it padded. It’s perfect! Thanks for the easy tutorial!! Julie
You are so welcome, Julie!!
I’m so glad it was helpful for you!
Beth
Pingback: Fear not the zipper. | l. j. renwanz
Thanks for the great tute – day off tomorrow, so looks like that is what I will be doing LOL
You are so welcome, Dasha! Hope you had fun with this!!!
This is the simplest, easiest to understand sewing tutorial for a zippered pouch I’ve seen yet. I know the basics of my machine but have been apprehensive to try anything more complicated than straight seams by myself. I’m heading to the craft store tomorrow for supplies to try this. I’m inspired! Thank you, from a beginning seamstress who really wants to learn!
You are so welcome, Lauren!! Thank YOU for your nice comments! Let me know if you have any questions.
Beth
Pingback: DIY: Gussy Up Your Denim With a Vintage Serape | The Renegade Seamstress
You make it look “sew” easy, can’t wait to make some of these!
Thank you, Jane. It did help to have a dress form for this project, but I do think it would be possible without one, too. Have fun!!!
Thanks. I’m make a pouch for all my electronic cords & iphone charger.
That’s a great idea!
Love the fabric you used.
Thank you, Kelly! It was actually from Wal-Mart.
Pingback: On little girls turning seven | Heavenly Handmade
Fantastic tutorial! I remember the first time I tried to sew a zipper. I was making a hobo-bag style purse from a tutorial on Craftster.org and was using a metal zipper. I sewed THROUGH the teeth of the zipper SNAPPED the needle in half and jammed up the whole machine! I thought sure I’d permanently broken it. But my cheapo little Brother sewing machine from WalMart survived just fine … new needle and picked out some of the jammed up thread and I was on my way again. Amazing the beating those things can take and keep working (Thank goodess for me ’cause I’m a craft-disaster sometimes LOL)
Thanks so much! I’m so glad you didn’t let a little roadblock like a broken needle get in the way of your sewing adventures!!!