Products:
- March-FX High Master 5-42×56 FFP
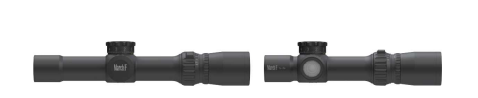
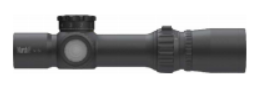
- March Hunting 1-10×24 Shorty
- March-F Short Tactical 1-8×24 FFP
- March-F Tactical 1-8×24 FFP
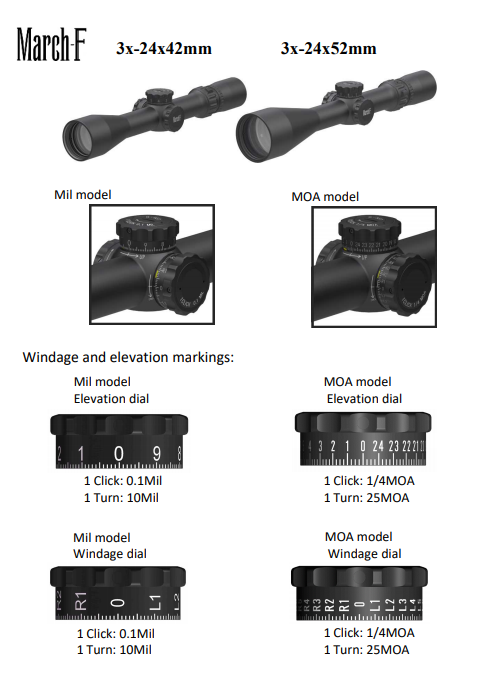
- March-F Tactical 3-24×42 FFP
- March-F Tactical 3-24×52 FFP
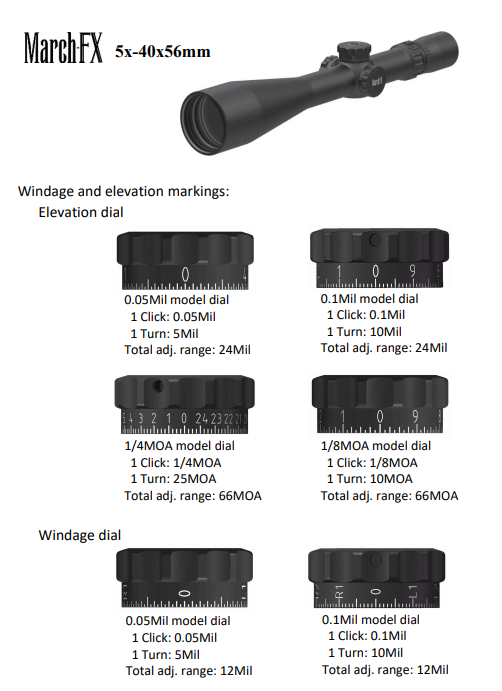
- March-FX Tactical 5-40×56 FFP
- March Genesis 6-60×56
- March Genesis 4x-40×52 FFP
- March Tactical 1-10×24 Shorty
- March Tactical 4.5-28×52
Before you mount your new March Scope
Your new March scope has come out of the factory but will need to be set up for your eyes. Before you begin using your March scope, you will need to take a moment to level the scope’s reticle, focus the reticle for
your eyes and bore sight your rifle. Leveling the reticle for your new March scope is covered on Page 4. Taking the time to do this as you set up your new scope is important to avoid canting and long range shooting errors. The best way to focus your March scope’s reticle is covered on Page 4. This can either be done before or after the scope is mounted on your rifle.
Bore sighting your March scope is covered in more detail on Page 5. Making sure the rings and bases are perfectly aligned before setting up your new scope will help to remove possible sighting errors by
eliminating structural pressure on your new scope. It will also keep your March scope as close to its optical center as possible. Adjusting your new March scope to the extremes of the elevation or windage dials prevents you from sighting through the central axis of the scope. This means you will see the target through the outer edges of the optics, and this will degrade the image resolution. We hope the following advice is helpful to you in setting up your new March scope.
Mounting your new March Scope
Preferred Rings and Bases
March recommends a one piece base such as a picatinny mount or a Stolle type benchrest rail. A one piece mount removes many of the alignment problems commonly seen in two piece mounting systems.
If a one piece base is not an option with your rifle, then that should not be a serious problem. We recommend that whenever scope rings are installed on a rifle, their alignment needs to be checked before a scope is mounted. The best way to do this is to use a precision 30mm ring (or 34mm for the March-X and March-FX models) alignment tool. Some lapping of the scope rings may be required to bring the scope rings into alignment. However, if a scope is mounted in rings that are out of alignment then damage to your new March scope could occur or potentially unreliable performance. Your March Scope dealer can advise on some proper tools to assist you mount your scope in the rings. Position the scope rings so they do not sit too near the extreme ends of the scope or even too close together and use a torque wrench to tighten the
scope ring screws. Positioning the rings at the extreme end of the scope body could also cause damage to your new March. Check manufacturers specifications for torque value. Usually 15-20 in-lbs but will vary
depending on Alloy or Steel.
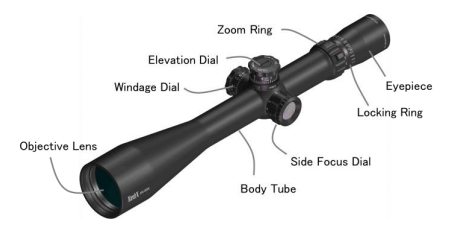
Setting the Eye Relief
With the bolt removed from the unloaded rifle, aim the rifle in your usual shooting position. Very slowly move your March scope until you can see the full field of view. No dark circles at the edges should be present at this stage, and there will be a comfortable eye relief.
Make sure that you set enough eye relief position of your scope to prevent injury from recoil. Setting your new scope with incorrect eye relief and improper mounting can cause physical damage to the shooter.
Leveling the Reticle
It is very important for the vertical reticle to be level with the center of your rifle’s bore. If this is not the case, canting of the rifle will occur and this will cause accuracy problems at long range. One of the easiest ways to check vertical alignment is to use a vertical string line for example at about 10m in front of your rifle. Making sure your rifle is completely level, look through your March scope and confirm the vertical reticle is in line with the vertical string line. At this point, use a torque wrench to tighten the scope ring screws. Be sure to not over tighten the screws as this could also cause damage to your new March. Check that the scope has not moved as the screws are tightened.
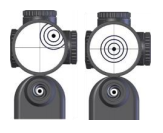
Focus the Reticle
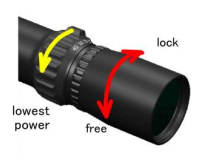
With your March scope securely installed on your rifle, it is now time to focus the reticle to your eyes. With your scope at its lowest power setting, rotate the eyepiece counterclockwise (when viewed from a normal
shooting position) until the eyepiece moves freely. Looking through scope, aim at plain back ground such as the blue sky or a sheet of white paper.
DO NOT ATTEMPT TO LOOK AT THE SUN, AS PERMANENT EYE DAMAGE WILL RESULT.
When you turn the eyepiece, the reticle’s clarity will change as the focal length changes. When the reticle is focused for your eyes, turn the locking ring counter-clockwise until it is firm against the eyepiece.
Do not attempt to over tighten but it must be firm.
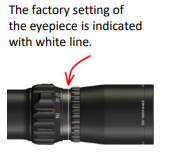
Eyepiece Adjustment Line
(Zoom Scopes except EP-Zoom)
The factory setting of the eyepiece is at -0.5 diopter. It is indicated with white line. The adjustment to suit normal eyesight should not be too far from this position. Once the eyepiece is set at the best position
for your eyes, it isn’t necessary to alter the setting often unless changing of visual acuity or user. The factory setting of the eyepiece is indicated with white line. Rotate eyepiece lock ring and align it on the white line to set back to factory setting of the eyepiece.
Sighting in your March Rifle Scope
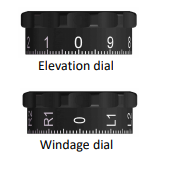
The easiest way to sight in your March scope is to bore sight your rifle against a target located between for example 25 and 50 meters away. Bore sighting is easy. With your rifle securely rested and the bolt removed, look through the bore and move the rifle until you can see the target centered in the bore. Without moving the rifle, look through the scope and adjust the windage and elevation setting to adjust the scope’s reticle to the center of the target. Fire a shot at the target and adjust the windage and elevation settings to move the reticle to the bullet’s point of impact. Turning the elevation dial towards “UP” moves the Point of Aim (POA) higher, while turning the dial towards “DN” moves the POA lower. Turning the windage dial towards “R” moves the POA to the right, while turning it to “L” moves the POA to the left. After you have adjusted your scope to the point of impact, move the reticle back to the center of the target and fire another shot. Repeat the adjustments to the windage and elevation dials until the point of aim meets
the point of impact.
Important note:
Please check where your dials settings are after you have zeroed your rifle to the point of aim. The farther away the adjustments are from the central position (elevation and windage) the more optical resolution will degrade. Also you will not have available full amount of elevation or windage in one direction. So if your scope adjustment is set a long way off center to get the rifle zeroed this will indicate the alignment of the rifle bore is not at the same axis of the scope mount or base position.
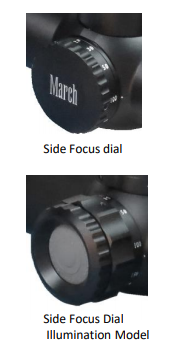
Focus/Parallax adjustment
Your March Rifle Scope has a side focus dial that can be used to focus the scope on targets from approximately 10 yards to infinity. The number on the dial is not an absolute reflection of the actual distance as this is affected by the user’s eyesight and changing environmental factors. It is critical, particularly for target shooting, that the setting be absolutely parallax free. This means there should be no movement of the reticle relative to the target. To check this, move your head very slightly upwards and down or left to right and see that the reticle position does not move on the target. Be careful not to accidentally move your rifle when checking this.
The reticle should remain in the exact position aimed on the target as you slightly move your head position for parallax free operation. Adjust the focus dial until parallax free. If parallax movement is not completely removed you will have larger than usual grouping dispersion of your shots.
If the focus dial or zoom ring is stiff.
The side focus dial and zoom ring may be stiff to rotate due to lack of use or during cold weather. This is due to a settling of the lubricant on the airtight seals over time, or an increased viscosity in the lubricant at lower temperatures. Gently turning the dial back and forth will restore normal function.
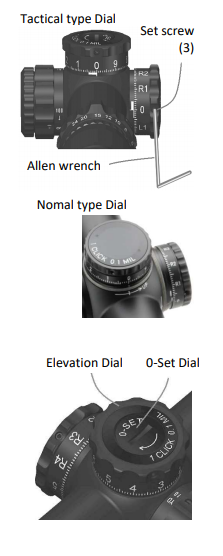
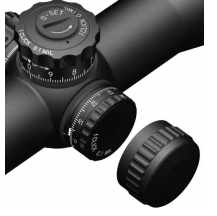
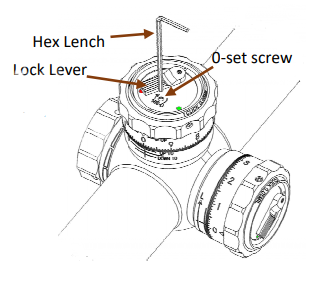
Setting Elevation and Windage Zero
Customising the windage and elevation zero on your new March scope is easy. Loosen the three set screws using the provided Allen wrench (see picture). Once loose, the dial should turn easily and you can set the dial to any position required. Retighten the set screws being careful not to over tighten them as damage may result.
Zero Set Function
March-F and March-FX models have a Zero Set capability. After setting the elevation dial to the desired position, hold the dial with your fingers and turn the “0-SET” Dial clockwise using a coin or correctly sized screw drive until the bottom stop is reached. At this point the elevation cannot be lowered and so you never lose your starting point. If you do not need to use the Zero Set function, turn the “0-SET” dial counterclockwise until it reaches the top of its travel.
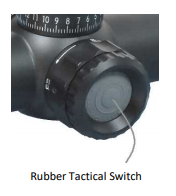
Illuminating the Reticle
The Illumination Model (where fitted) on March scopes produces four levels of light intensity on the reticle for precision shooting in low light or night conditions. Pushing the rubber switch on the focusing dial activates the Illumination mode. The Illumination Model cycles through OFF1-2-3-4-OFF each time the switch is pressed. The 4 setting is the brightest. The llumination Model will automatically switch off after one
hour to conserve battery life.
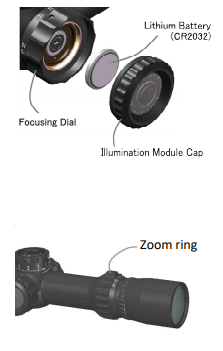
Changing the battery in the Illumination Model
Turn the switch counter-clockwise to expose the battery compartment. Replace the battery with a lithium CR2032 battery. Pay special attention to the battery polarity: the positive (+) side of the battery must face the scope body.
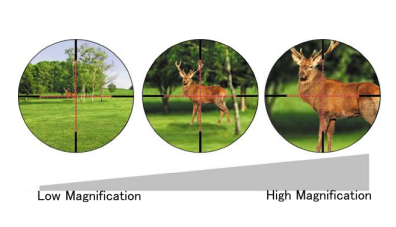
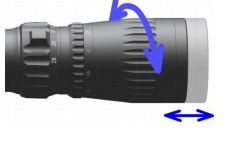
Using the Zoom to change magnification
Turn the zoom ring clock wise to increase your scope’s magnification and counter-clockwise to decrease magnification. Use the index point to select the most appropriate setting
Modifier Disk
- 35mm MD Disk(Standard Option for Fixed Power Scopes, EP-Zoom, 10-60×52 Models)
- 43mm MD Disk(Extra-cost Option for 56mm Models)
The Modifier Disk does not use any lenses. It is a lightweight aluminum disk with a smaller diameter hole in it to reduce the amount of light entering the scope. The Modifier Disk screws onto the scope via the threads in front of the objective lens.
Using Modifier Disk with your March scope will:
a; reduce the amount of light entering the scope by as much as 50%(35mmMD disk), 40%(43mm MD disk). (depending on the brightness of the conditions)
b; increase the depth of focus by up to 50%(35mm MD disk), 40%(43mmMD disk).
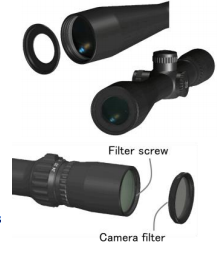
If unnecessary brightness is reduced and the focus depth increased, a user’s ability in reading mirage is enhanced as the sight picture is more defined in difficult conditions. For light reduction purposes, it is
possible to use a camera filter on the eyepiece (Ø = 37mm, P= 0.75). March recommends against using a filter on the objective lens because this affects target resolution.
Flip Cap
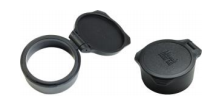
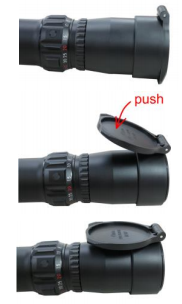
a)Slide the correctly sized flip cap onto the eyepiece or objective end of the scope until it meets the inner edge of the cap. If the flip cap is difficult to install due to stiffness, warm it up first (only warm it slightly, do not apply direct heat).
b) After flipping the cap open, push the cap down until it locks into the open position. Make sure to lock the cap open when using the scope.
c) While flip caps protect against rain and dust, they are not waterproof. All March scopes are waterproof
| Parts No. | Item | Model |
| FC-41 | 41mm Flip cap for eyepiece | Eyepiece |
| FC-46 | 46mm Flip cap for eyepiece | Wide Angle Eyepiece |
| FC-33 | 33mm Flip cap for 24mm objective | 1x-4×24, 1x-4.5×24, 1x-8×24, 1x-10×24 |
| FC-51 | 51mm Flip cap for 42mm objective | 2.5×25-42, 3x-24x-42, 1.5x-15×42 |
| FC-60 | 60mm Flip cap for 52mm objective | 2.5x-25×52, 3x-24×52, 10x-60×52, 4.5x-28×52, 4x-40×52 |
| FC-64 | 64mm Flip cap for 56mm objective | 5x-40×56, 5x-50×56, 8x-80×56, 10x-60×56, 5x-42×56, 6x-60×56 |
Fast Lever
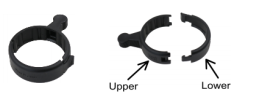
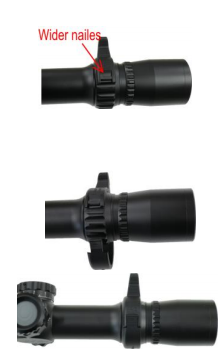
a)Firstly set the upper part of Fast Lever (with knob) on the scope magnification zoom ring. Set the wider nails toward left. Set the lever knob right on the scope zoom ring knob. Make sure if the lever can fit on the
scope zoom ring properly.
b) Next set the lower part of lever on the scope zoom ring. Set the small hook of the lower part onto the windage side hook of the upper part. Then set the bigger hook of the lower part onto the other side of the upper part until it clicks into place. It will be all set when the lever can fit and cover on the scope zoom ring completely.
How to remove the lever?
Once unhook the bigger hook of the lower part, all parts can be removed easily.
Manufacturing a March
Lens Design
March Rifle Scopes (except 1x-4×24, 1x-4.5×24, 1x-8×24 and 1x-10×24) use multi-coated Extra-low Dispersion (ED) lenses to reduce chromatic aberration and to provide high image resolution even at maximum magnification. ED lenses have a smaller refractive index than typical optical lenses in the blue to red wavelength. This produces superior sharpness and color correction. ED lenses are often used in microscopes, high-end telescopes and semiconductors. ED lenses make it possible to maintain a consistent, high quality image from the lowest to highest magnification settings in your new March scope.
Internal Construction
March Rifle Scopes are made from specially heat-treated, high-grade aluminum, special alloy steel and brass. The scope body is filled with argon gas to create a stable environment. To ensure that March Scopes
remain airtight, each scope is fitted with high performance, industrial grade rubber O-rings. Importantly, March Rifle Scopes contain no plastic internal parts.
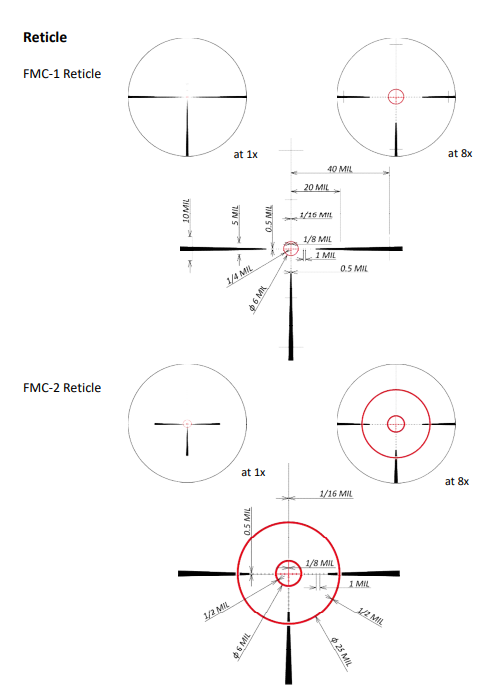
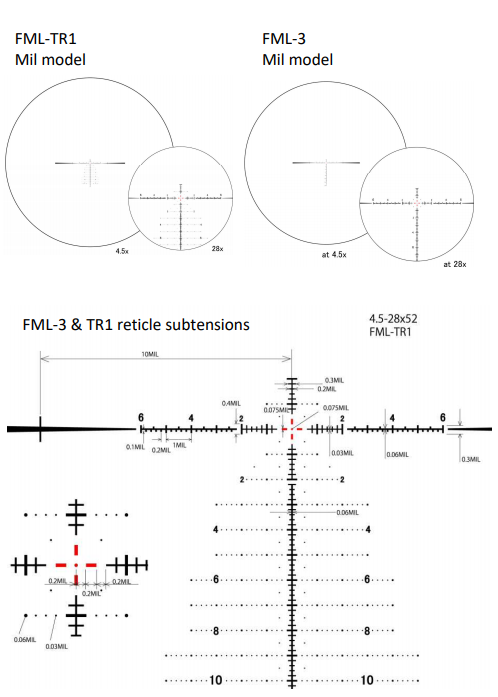
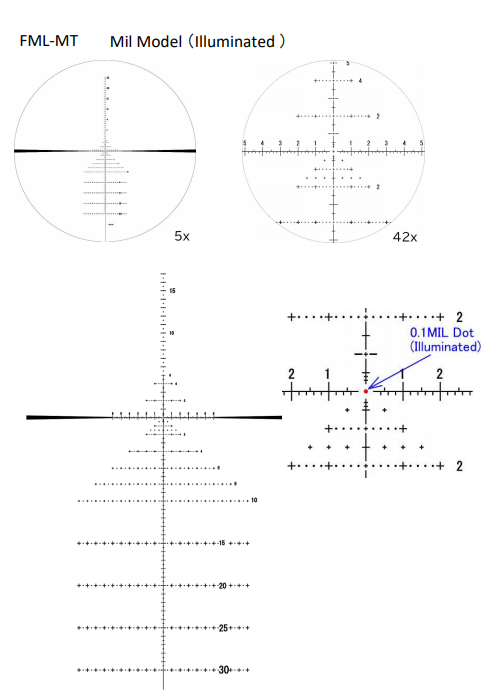
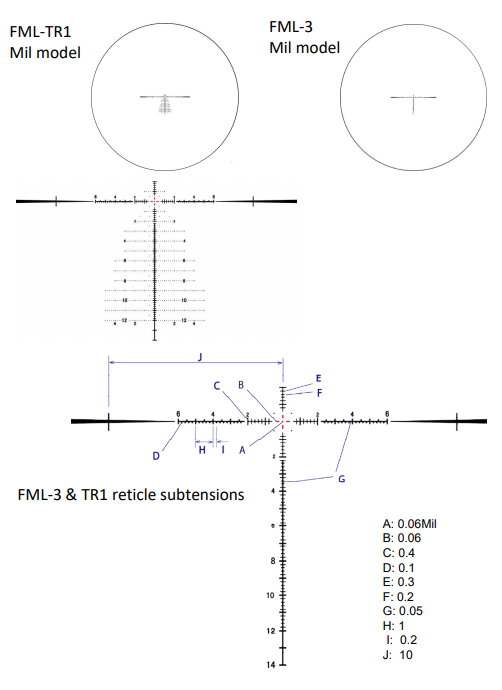
First Focal Plane (FFP) design;
A reticle placed in the first focal plane will keep the same value regardless of the magnification setting selected. This helps to simplify ranging targets and aiming off in difficult conditions. The reticle and the
target will increase in size as the magnification is increased but any hash marks or divisions in the reticle pattern will retain a constant value. For example, one Mil-Radian is a consistent measurement across the
whole power range. To determine what measurements are covered by your March’s reticle, please refer to the reticle information contained at the end of this manual.
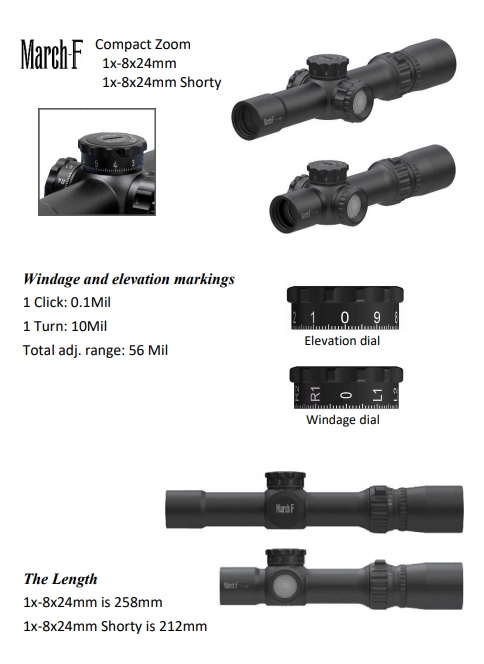
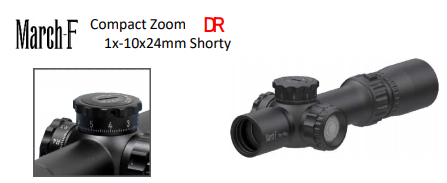
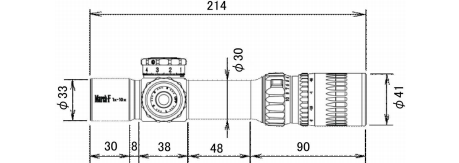
The March-F 1x-10x24mm Shorty is the world’s lightest and shortest scope with 10 magnification ratio. The length is only 214mm(8.4 inch) and the weight is only 495g(17.5oz).
Windage and elevation markings
1 Click: 0.1Mil
1 Turn: 10Mil
Total adj. range: 56 Mil


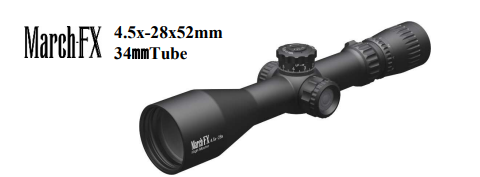
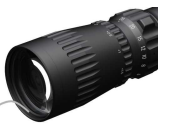
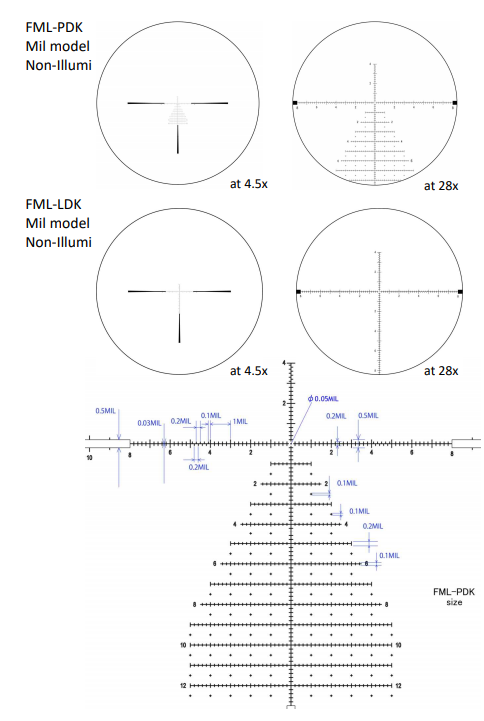
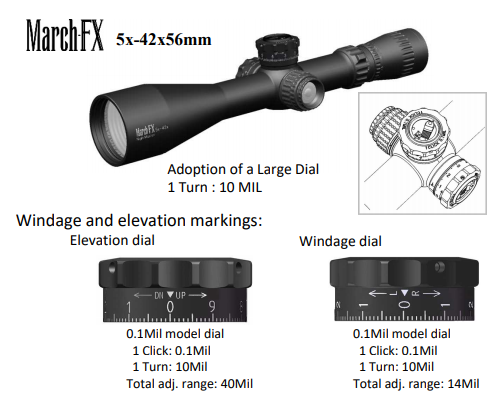
First Focal Plane Scope with 6.2 Magnification Ratio incorporates High Master optical system combined with a thermal construction. This 4.5-28×52 scope guarantees superb image quality and focus stability across a broad range of temperatures.
25 Degree Wide Angle (Large Eye Box) Eyepiece will enhance FOV throughout the 6.2 magnification range.Fast pitch eyepiece setting comes in handy when the time is the essence.
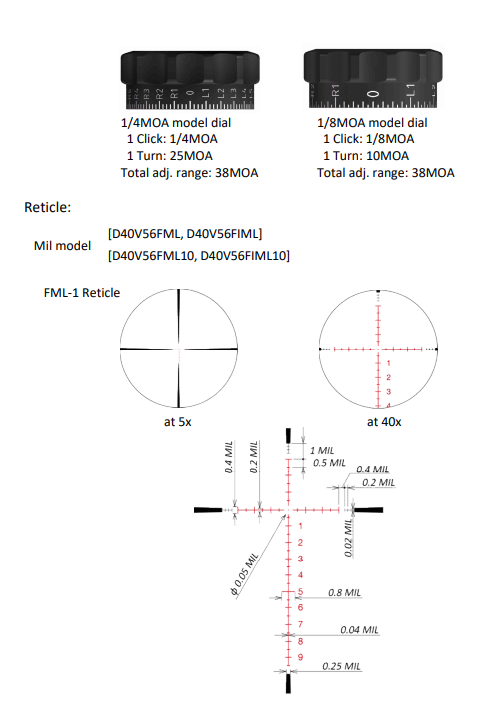
Windage and elevation markings:
Elevation dial
0.1Mil model dial
1 Click: 0.1Mil
1 Turn: 10Mil
Total adj. range: 36Mil
Windage dial with cap
0.1Mil model dial
1 Click: 0.1Mil
1 Turn: 10Mil
Total adj. range: 20Mil
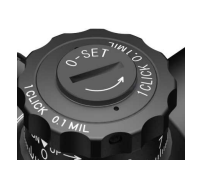
Zero Set Function
March-FX 4.5x-28×52 models have a Zero Set capability. After setting the elevation dial to the desired position, hold the dial with your fingers and turn the “0-SET” Dial counterclockwise using a coin or correctly sized screw drive until the bottom stop is reached. At this point the elevation cannot be lowered and so you never lose your starting point. If you do not need to use the Zero Set function, turn the “0-SET”
dial clockwise until it reaches the top of its travel.
For light reduction purposes, it is possible to use a camera filter on the eyepiece (Ø = 43mm, P= 0.75). March recommends against using a filter on the objective lens because this affects target resolution.
“NOTE:
This riflescope has an internal adjustment range of 40MIL; 20 up, 20 down. In any riflescope the best image quality is at or near the center of the adjustments. Because of the very wide adjustment range of this riflescope, you may experience some image quality degradation as you near the limits of the adjustment range. This can occur because of the extreme refraction of the incoming light at the edges of the objective lens. This degradation will worsen as the magnification increases. Therefore, we recommend using an appropriate canted rail if you plan to use this riflescope consistently near the limits of the adjustment range and at higher magnification. It can be utilised to gain additional elevation and to keep the scope optically centred as much as possible. A 20MOA rail will shift the adjustment range by about 5.7MIL to 25.7MIL up and 14.3MIL down. A 30MOA rail will shift the adjustment range by about 8.6MIL to 28.6MIL up and 11.4MIL down.
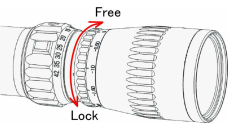
Dial Locking Mechanism
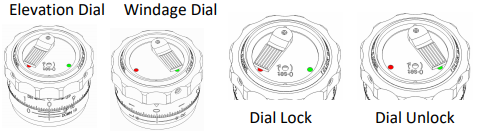
When setting the Lock Lever on top of the Dial at the red mark, the Dial will be locked.
When setting the Lock Lever on top of the Dial at the green mark, the Dial will be unlocked.
0-Set
After setting the Elevation Dial at the desired position, screw in the hexagon socket screw on top of the Dial until it stops. Elevation Dial can only be used in the Upward direction than that position.
Focus Dial Locking Mechanism
By adopting the focus dial locking system, it avoids the focus dial to be turned unexpectedly and being out of focus. When pushing in the focus dial to the red direction, it will lock as in the right figure. When pulling it out to the blue direction, it will be unlocked.
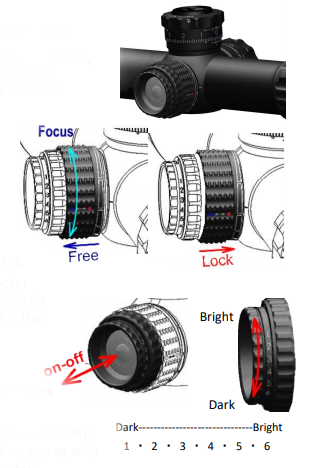
Six Level Illumination switch
By rotating the dial, the shooter can change the brightness from six levels. 1 is the darkest and 6 is the brightest. The rubber switch turns illumination on or off while maintaining the selected brightness level.
The illumination switch will automatically shut down after one hour of no use as with the four level illumination switch. When turning on the switch after being turned off, it will illuminate in the previously selected brightness level.
In order to change the battery (please refer to the left figure), turn the switch counterclockwise to open the battery compartment and then replace the battery with a lithium battery (CR2032). The flat surface of the battery (+) must face the scope body. After replacing the battery, please lock in the switch by turning it clockwise.

Fast focus & Wide angle Eyepiece
This Fast Focus Eyepiece is capable of adjusting ±2 diopter in a single turn. Hence this enables prompt adjustment for the Eyepiece. With this 26 Degree Wide Angle Eyepiece, you will be able to aim the target / game with a wide view.
Focus the Reticle
With your March scope securely installed on your rifle, it is now time to focus the reticle to your eyes. With your scope at its lowest power setting, rotate the eyepiece counter-clockwise (when viewed from a normal shooting position) until the eyepiece moves freely. Looking through scope, aim at plain back ground such as the blue sky or a sheet of white paper.
DO NOT ATTEMPT TO LOOK AT THE SUN, AS PERMANENT EYE DAMAGE WILL RESULT.
When you turn the eyepiece, the reticle’s clarity will change as the focal length changes. When the reticle is focused for your eyes, turn the locking ring counter-clockwise until it is firm against the eyepiece.
Do not attempt to over tighten but it must be firm.
|
1x-8x-24 FFP Scope |
|||||
|
SPECIFICATION |
|||||
|
Model No. |
D8V24FML |
D8V24FIML |
D8SV24FIML |
||
|
Magnification |
Low |
1x |
|||
|
High |
8x |
||||
|
Effective Lens Diameter |
24mm |
||||
|
Exit Pupil |
High |
3mm |
|||
|
Field of View real |
Degree |
Low |
19.67 º |
||
|
High |
2.46 º |
||||
|
Ft/Yd |
Low |
104ft/100Yd (34.67m/100m) |
|||
|
High |
12.9ft-100Yd (4.30m/100m) |
||||
|
Eye Relief |
Low |
74-102mm |
|||
|
High |
74-97mm |
||||
|
1 Click Value |
0.1 Mil |
||||
|
1 Turn travel |
10 Mil |
||||
|
Elevation Travel |
56 Mil |
||||
|
Windage Travel |
56 Mil |
||||
|
Focus |
Side Focus/Parralax |
Fixed |
|||
|
Distance |
10yd-Infinity |
100yd |
|||
|
Finish |
Matte Black |
||||
|
Illumination |
– |
Illumination |
Illumination |
||
|
Reticle |
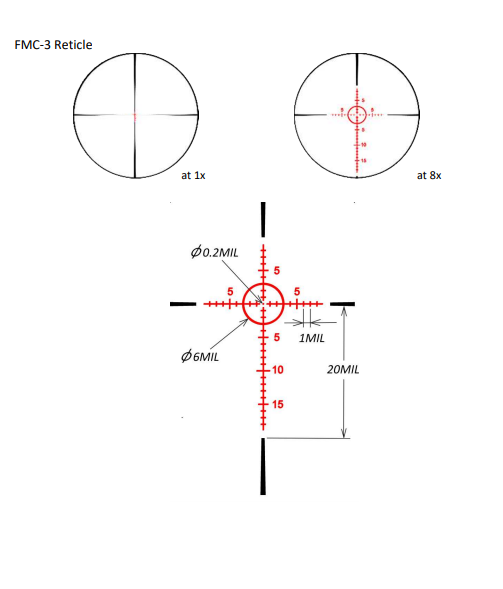
FMC-1, FMC-2, FMC-3 |
||||
|
Body Tube Diameter |
30mm |
||||
|
Weight |
530g (18.7oz) |
560g(19.8oz) |
485g(17.1oz) |
||
|
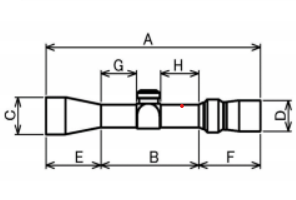
1x-8×24 |
1x-8×24 Shorty |
|
|
A |
258mm (10.2inch) |
212mm (8.3inch) |
|
B |
129mm (5.1inch) |
83mm (3.3inch) |
|
C |
33mm (1.3inch) |
33mm (1.3inch) |
|
D |
41mm (1.6inch) |
41mm (1.6inch) |
|
E |
35mm (1.4inch) |
35mm (1.4inch) |
|
F |
94mm (3.7inch) |
94mm (3.7inch) |
|
G |
49mm (1.9inch) |
3mm (0.11inch) |
|
H |
42mm (1.7inch) |
42mm (1.7inch) |
March First Focal Plane Reticle Scope Instruction Manual
|
1x-10x-24 FFP Scope |
|||
|
SPECIFICATION |
|||
|
Model No. |
D10SV24FIML |
||
|
Magnification |
Low |
1x |
|
|
High |
10x |
||
|
Effective Lens Diameter |
24mm |
||
|
Exit Pupil |
Low |
8.6mm |
|
|
High |
2.4mm |
||
|
Field of View real |
Degree |
Low |
19.2º |
|
High |
1.92º |
||
|
Ft/Yd |
Low |
101.5ft/100Yd (33.83m/100m) |
|
|
High |
10.05ft/100Yd (3.35m/100m) |
||
|
Eye Relief |
Low |
72-102mm |
|
|
High |
75-100mm |
||
|
1 Click Value |
0.1 Mil |
||
|
1 Turn travel |
10 Mil |
||
|
Elevation Travel |
56 Mil |
||
|
Windage Travel |
56 Mil |
||
|
Focus |
Side Focus/ Parralax |
||
|
Distance |
10yd-Infinity |
||
|
Finish |
Matte Black |
||
|
Illumination |
Illumination |
||
|
Reticle |
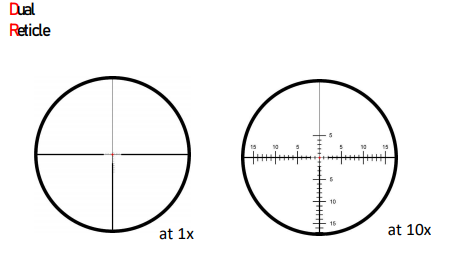
DR-1 |
||
|
Body Tube Diameter |
30mm |
||
|
Weight |
500g(17.6oz) |
||
March First Focal Plane Reticle Scope Instruction Manual

|
3x-24x-42 FFP Scope |
|||||||
|
SPECIFICATION |
|||||||
|
Model No. |
MIL Model |
MOA Model |
|||||
|
D24V42FML |
D24V42FIML |
D24V42FMA |
D24V42FIMA |
||||
|
Magnification |
Low |
3x |
|||||
|
High |
24x |
||||||
|
Effective Lens Diameter |
42mm |
||||||
|
Exit Pupil |
High |
1.75mm |
|||||
|
Field of View real |
Degree |
Low |
6.67º |
||||
|
High |
0.83º |
||||||
|
Ft/Yd |
Low |
35ft-100Yd (11.66m/100m) |
|||||
|
High |
4.3ft/100Yd (1.45/100m) |
||||||
|
Eye Relief |
Low |
85-100mm |
|||||
|
High |
89-96mm |
||||||
|
1 Click Value |
0.1 Mil |
¼ MOA |
|||||
|
1 Turn travel |
10 Mil |
25 MOA |
|||||
|
Elevation Travel |
28 Mil |
100 MOA |
|||||
|
Windage Travel |
28 Mil |
100 MOA |
|||||
|
Focus |
Side Focus/Parallax |
||||||
|
Distance |
10yd-Infinity |
||||||
|
Finish |
Matte Black |
||||||
|
Illumination |
– |
Illumination |
– |
Illumination |
|||
|
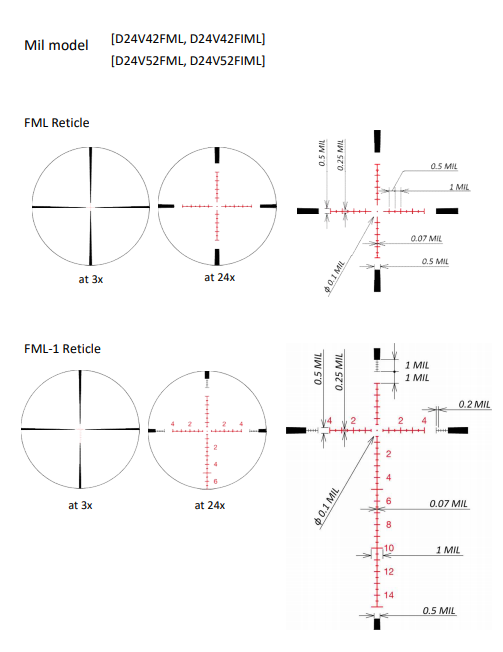
Reticle |
FML FML-1 FML-T1 |
FML FML-1 FML-T1 |
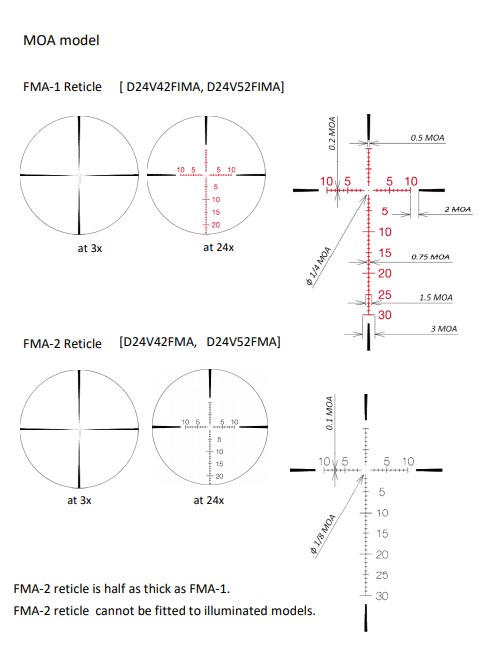
FMA-2 |
FMA-1 |
|||
|
Body Tube Diameter |
30mm |
||||||
|
Weight |
610g (21.5oz) |
640g(22.06oz) |
610g (21.5oz) |
640g(22.06oz) |
|||
|
3x-24x-42 FFP Scope |
|
|
A |
312mm (12.28inch) |
|
B |
139mm (5.47inch) |
|
C |
51mm (2.01inch) |
|
D |
41mm (1.61inch) |
|
E |
81mm (3.19inch) |
|
F |
92mm (3.62inch) |
|
G |
53mm (2.09inch) |
|
H |
48mm (1.89inch) |

|
3x-24x-52 FFP Scope |
|||||||
|
SPECIFICATION |
|||||||
|
Model No. |
MIL Model |
MOA Model |
|||||
|
D24V52FML |
D24V52FIML |
D24V52FMA |
D24V52FIMA |
||||
|
Magnification |
Low |
3x |
|||||
|
High |
24x |
||||||
|
Effective Lens Diameter |
52mm |
||||||
|
Exit Pupil |
High |
2.17mm |
|||||
|
Field of View real |
Degree |
Low |
6.67º |
||||
|
High |
0.83º |
||||||
|
Ft/Yd |
Low |
35ft-100Yd (11.66m/100m) |
|||||
|
High |
4.3ft/100Yd (1.45/100m) |
||||||
|
Eye Relief |
Low |
85-100mm |
|||||
|
High |
89-96mm |
||||||
|
1 Click Value |
0.1 Mil |
¼ MOA |
|||||
|
1 Turn travel |
10 Mil |
25 MOA |
|||||
|
Elevation Travel |
34 Mil |
120 MOA |
|||||
|
Windage Travel |
17 Mil |
60 MOA |
|||||
|
Focus |
Side Focus/Parallax |
||||||
|
Distance |
10yd-Infinity |
||||||
|
Finish |
Matte Black |
||||||
|
Illumination |
– |
Illumination |
– |
Illumination |
|||
|
Reticle |
FML FML-1 FML-T1 |
FML FML-1 FML-T1 |
FMA-2 |
FMA-1 |
|||
|
Body Tube Diameter |
30mm |
||||||
|
Weight |
665g (23.3oz) |
695g(24.3oz) |
665g (23.3oz) |
695g(24.3oz) |
|||
|
3x-24x-42 |
|
|
A |
336mm (13.23inch) |
|
B |
139mm (5.47inch) |
|
C |
60mm (2.36inch) |
|
D |
41mm (1.61inch) |
|
E |
105mm (4.13inch) |
|
F |
92mm (3.62inch) |
|
G |
53mm (2.09inch) |
|
H |
48mm (1.89inch) |

|
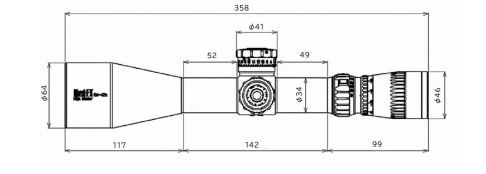
4.5x-28x-52 FFP Scope |
||||
|
SPECIFICATION |
||||
|
Model No. |
MIL Model |
|||
|
D28HV52WFIML |
D28HV52WFML |
|||
|
Magnification |
Low |
4.5x |
||
|
High |
28x |
|||
|
Effective Lens Diameter |
52mm |
|||
|
Exit Pupil |
Low |
4mm |
||
|
High |
1.86mm |
|||
|
Field of View real |
Degree |
Low |
5.56º |
|
|
High |
0.892º |
|||
|
Ft/Yd |
Low |
29.1ft-100Yd (9.7m/100m) |
||
|
High |
4.68ft/100Yd (1.56/100m) |
|||
|
Eye Relief |
Low |
70-93.7mm |
||
|
High |
72-90mm |
|||
|
1 Click Value |
0.1 Mil |
|||
|
1 Turn travel |
10 Mil |
|||
|
Elevation Travel |
36 Mil |
|||
|
Windage Travel |
20 Mil |
|||
|
Focus |
Side Focus/Parallax |
|||
|
Distance |
10yd-Infinity |
|||
|
Finish |
Matte Black |
|||
|
Illumination |
Illumination |
– |
||
|
Reticle |
FML-3 FML-TR1 |
FML-PDK FML-LDK |
||
|
Body Tube Diameter |
34mm |
|||
|
Weight |
845g |
815g |
||
|
4.5x-28x-52 |
|
|
A |
318mm (12.5inch) |
|
B |
129mm (5.0inch) |
|
C |
60mm (2.4inch) |
|
D |
46mm (1.8inch) |
|
E |
93mm (3.7inch) |
|
F |
96mm (3.8inch) |
|
G |
42mm (1.6inch) |
|
H |
49mm (1.9inch) |

|
5x-40x-56 FFP Scope SPECIFICATION |
||||||||||
|
0.05MIL |
0.1MIL |
1/4MOA |
1/8MOA |
|||||||
|
Model No. |
D40V56FML |
D40V56FIML |
D40V56FML10 |
D40V56FIML10 |
D40V56FMA4 |
D40V56FIMA4 |
D40V56FMA8 |
D40V56FIMA8 |
||
|
Magnification |
Low |
5x |
||||||||
|
High |
40x |
|||||||||
|
Effective Lens Diameter |
56mm |
|||||||||
|
Exit Pupil |
High |
1.4mm |
||||||||
|
Field of View real |
Degree |
Low |
4º |
|||||||
|
High |
0.5º |
|||||||||
|
Ft/Yd |
Low |
21ft-100Yd (6.98m/100m) |
||||||||
|
High |
2.6ft/100Yd (0.87/100m) |
|||||||||
|
Eye Relief |
Low |
96-100mm |
||||||||
|
High |
92-98mm |
|||||||||
|
1 Click Value |
0.05MIL |
0.1MIL |
1/4MIL |
1/8MIL |
||||||
|
1 Turn travel |
5 MIL |
10MIL |
25MIL |
10MIL |
||||||
|
Elevation Travel |
24 Mil |
66MOA |
||||||||
|
Windage Travel |
12 Mil |
38MOA |
||||||||
|
Focus |
Side Focus/Parallax |
|||||||||
|
Distance |
10yd-Infinity |
|||||||||
|
Finish |
Matte Black |
|||||||||
|
Illumination |
– |
illumi |
– |
illumi |
– |
illumi |
– |
illumi |
||
|
Reticle |
FML-1 |
FML-1 |
FML-1 |
FML-1 |
FMA-2 |
FMA-2 |
FMA-2 |
FMA-2 |
||
|
Body Tube Diameter |
34mm |
|||||||||
|
Weight |
860g (30.3oz) |
890g (31.4oz) |
860g (30.3oz) |
890g (31.4oz) |
860g (30.3oz) |
890g (31.4oz) |
860g (30.3oz) |
890g (31.4oz) |
||
|
5x-40x-56 |
|
|
A |
387mm (15.2inch) |
|
B |
155mm (6.1inch) |
|
C |
64mm (2.5inch) |
|
D |
41mm (1.6inch) |
|
E |
144mm (5.7inch) |
|
F |
88mm (3.5inch) |
|
G |
66mm (2.6inch) |
|
H |
52mm (2.0inch) |

|
March 5x-42x-56HM SPECIFICATION |
|||
|
MIL Model |
|||
|
Model No. |
D42HV56WFIML |
||
|
Magnification |
Low |
5x |
|
|
High |
42x |
||
|
Effective Lens Diameter |
56mm |
||
|
Exit Pupil |
Low |
5.2mm |
|
|
High |
1.33mm |
||
|
Field of View real |
Degree |
Low |
5.2º |
|
High |
0.62º |
||
|
Ft/Yd |
Low |
26.19ft-100Yd |
|
|
High |
3.25ft/100Yd |
||
|
Eye Relief |
Low |
71-90.4mm |
|
|
High |
74.2-90mm |
||
|
1 Click Value |
0.1MIL |
||
|
1 Turn travel |
10MIL |
||
|
Elevation Travel |
40MIL |
||
|
Windage Travel |
14MIL |
||
|
Focus |
Side Focus/Parallax |
||
|
Distance |
10m-Infinity |
||
|
Finish |
Matte Black |
||
|
Illumination |
illumination |
||
|
Reticle |
FML-MT FML-TR1 FML-3 |
||
|
Weight |
950g |
||
Caring for your March Rifle Scope
March Rifle Scopes are sealed units. However condensation may form on the outside of the lens under extreme conditions. Should this occur, dry with a soft lens cloth immediately and allow the lens to dry completely. Doing this will prevent water spots from developing on the lens surface.
March recommends that only quality lens cleaning material is used on the objective and eyepiece lenses to avoid scratching the glass.
Repair Services
Please retain and follow the Warranty paperwork in case your March Rifle Scope requires repair with the Warranty period. Please inquire of the dealer purchased from, and follow their repair request instruction. When returning your March Rifle Scope for repair, please enclose and provide a full description of the issue you are having on the form provided with your Warranty. Should repairs be required outside Warranty period, please contact the dealer purchased from or Deon Optical Design Corporation before sending.


