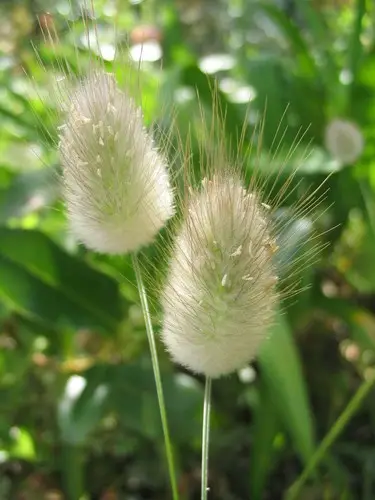
What should I do if I water my Hare's-tail grass too much or too little?
Without proper watering, this beautiful ornamental grass will underperform. In the ground, watering issues can be solved, but In a container, too much or too little water will kill Hare's-tail grass in short order. When Hare's-tail grass isn't receiving the right amount of water, it may stop growing. In the case of overwatering, it will begin to display yellow leaves with brown tips. Underwatering can produce drooping leaves, weak seed head production, and browned leaves. If you suspect your Hare's-tail grass has been improperly watered, the first thing to do is figure out if the problem is too much or too little. If your Hare's-tail grass is getting too much water, stop watering it immediately. Sometimes it can take weeks for heavy soils to dry out, so be patient. At the first sign of new growth, test the soil for moisture and decide whether it needs more water or not. The solution for Hare's-tail grass receiving too little water is even simpler: give the grasses a nice, deep drink and see if it perks up. Bearing all of this in mind, remember that a long, deep watering is always better than a lot of shallow, frequent waterings. The reason for this is that deep watering encourages grasses to grow deep roots, which makes them more drought resistant and less prone to problems from watering.
![more]()
How often should I water my Hare's-tail grass?
The watering needs of Hare's-tail grass will vary depending on where it is planted. Generally, you should water this grass every week. In hot climates, once or twice a week watering in the summer may be necessary. In moderate climates, watering once every seven days or more may be enough. Grass in containers almost always need more frequent watering than grasses in the ground. But with a species such as this that can thrive in full sun or part shade, the location also matters. Shaded grasses need to be watered less frequently than in-ground grasses. Hare's-tail grass should only be watered when the soil is dry. If you’re unsure when to water, there are a few key signs you can use as your cue. Pressing your finger a couple of inches into the soil will tell you if the soil is dry. For a potted grass, you can weigh the grass with a portable scale to see how light it is, but you can also quickly feel when the pot is light from lack of water. Like many types of grass, the blades may appear folded along their centers and thinner than usual when the roots lack sufficient water. Despite its drought tolerance, regular, deep waterings will reward you with a beautiful color. In the wild, Hare's-tail grass grows in open scrubland, where it would be subject to extreme heat, loads of bright sun, and intermittent rain. Because this grass is drought resistant, you might expect never to need to water it. But don’t let its hardiness fool you, Hare's-tail grass still needs care and attention. Even though this hardy grass can handle harsh, dry conditions, gardeners agree that it thrives best with consistent water. When first planted, Hare's-tail grass will need more frequent water until it has established deep roots. For Hare's-tail grass in pots, the soil will dry out quickly, especially if the pot is in hot, direct sun for a large part of the day. Test the soil every 3 to 4 days and water only when it feels dry. Hare's-tail grassed in the ground generally needs less watering, but that depends on the soil it is grown in. Heavy clay soil holds water for a long time and may feel dry at the surface while still retaining plenty of moisture below the ground. Sandy soils that drain quickly will need to be watered more often.
![more]()
What should I be careful with when I water my Hare's-tail grass in different seasons, climates, or during different growing?
You can often tell if you are watering enough by the rate of growth of your grasses. Hare's-tail grass during the hottest months of the year and has been known to double in size in a year’s time. If the weather is hot and the grass is not growing vigorously, you may need to adjust your watering schedule. In winter, you might be able to get away with watering only once a month, but you will still want to touch the soil to test for moisture. During a growth cycle (in the warmest months), the grass will need more water than usual. But during winter and cooler months, the need for water will be dramatically reduced. The most important thing to remember about Hare's-tail grass is that the soil it is planted in should always be allowed to dry out completely before adding water.
![more]()
Is pruning necessary for my Hare's-tail grass?
Hare's-tail grass is a kind of annual plant so it doesn't need much pruning. You only need to cut off and clean the diseased, yellow or dropped leaves and stems during its growing period. This will help your Hare's-tail grass to stay away from pathogens infection.
![more]()
How do I prune my Hare's-tail grass?
During the growth of the plant, yellowing, drying and spotted leaves are produced, and these spotted and discolored leaves need to be trimmed off. If the whole piece of leave is discolored or infected, you will need to cut it off completely. In other situations, you will only need to cut off the discolored or infected part on certain leaves. Hare's-tail grass above the ground will die and dry up in the winter, and the dead plants need to be cleaned up.
![more]()
Are there any cautions I should be careful with when pruning my Hare's-tail grass?
Hare's-tail grass leaves are delicate, so take care not to score or bruise them. Unless the leaves are withered or heavily discolored, do not prune the leaves from the lowermost branches unless they’re damaged. They typically grow the largest, so they supply the plant with critical energy to keep it growing right. Please prevent the wounds from water after pruning until they are fully recovered. Remember always sterilize the tools before pruning. When the pruning is finished, please throw all the waste leaves and stems into the trashbins to avoid diseases and bugs.
![more]()
Are there any tips for pruning my Hare's-tail grass?
Sterilize all the tools before pruning; unclean tools will pass pathogens to the plant through wounds; Prune on sunny days because the new cuts will be infected by pathogens if they're distained by rain or water. Throw all the waste leaves and stems into trashbins, they will easily rot and attract diseases and bugs
![more]()
When should/shouldn't I prune my Hare's-tail grass?
Expect to prune your Hare's-tail grass every week if it’s growing well or every two weeks if it grows slowly. It is always good to prune it on sunny days because if you prune it on rainy days, the rainwater will distain the cuts and cause the whole plant to be infected.
![more]()
What should I look for when pruning my Hare's-tail grass in different seasons?
Because Hare's-tail grass is an annual plant, the pruning should take place basically during the seasons that the plant grows rapidly. During the growth of the plant, yellowing, drying and spotted leaves are produced, and these spotted and discolored leaves need to be trimmed off.
![more]()
How much sunlight should Hare's-tail grass get per day to grow healthily?
You must expose the plants to at least 6 to 8 hours of sunlight daily. They prefer more exposure to the morning light, especially in the summer. The Hare's-tail grass needs full sun and more sunlight that it can get. The more light these species get, the more they can manufacture food, produce beautiful blooms, and survive.
![more]()
What type of sunlight does Hare's-tail grass need?
The Hare's-tail grass grows best under full sunlight. It's best not to crowd them together so they can get exposure to the sun evenly. The leaves shouldn't be starved with sunlight. If planted in pots, try to expose the herbaceous flowers in windows with direct sun and ensure they receive full sunlight regardless of the months. They don't tend to do well in partial or filtered light as this will not produce strong stems and healthy flowers. It's best if the Hare's-tail grass is always exposed to the sun.
![more]()
Can sunlight hurt plants? How to protect Hare's-tail grass from sun and heat damage?
When the temperature rises above 90℉(32℃), the Hare's-tail grass can get damaged by extreme temperatures, especially if they are exposed to many hours of sun. It's always ideal for providing some shade from the light in the afternoon in the summer. It's always important to keep in mind that the sunlight in the summer is stronger than the one in the winter. Sunlight exposure is also 50% longer in the summer than in the winter. If the Hare's-tail grass is too stressed with sunlight, you might want to keep them fully hydrated. Water them when the top of the soil is about 2 inches dry, and move the plants indoors if it's too hot outside. This is the case if they are planted in containers. It can be normal for the plant leaves to wilt during the day. Generally, they can recover at night. However, when you notice that the Hare's-tail grass is still drooping, this means that the plant is losing water fast, and you need to water them.
![more]()
Should I protect Hare's-tail grass from sun exposure?
The Hare's-tail grass does not need any protection from the sun. In fact, they love the sun, and some species are heliotropic. Plant them in south-facing gardens whenever possible so they can be exposed from morning to afternoon. While the sun can benefit them, some may experience a sunburn. You might offer protection from the afternoon and midday sun through a shade of a tree or a wall. Growing the Hare's-tail grass in shady areas is impossible because the larger flowers would require a lot of energy to grow and produce. Always provide the lighting conditions and set them in an area with full sun for best results.
![more]()
What will happen if Hare's-tail grass gets inadequate sunlight?
When the Hare's-tail grass does not get adequate sunlight, or they are not placed in full sun locations, it's worth noting that the photosynthetic process will slow down. A lack of sunlight will cause the stems to become more leggy since they become thin and long since they tend to seek too much sunlight. They will not bloom and produce seeds in the shade. Inadequate sunlight will also mean that the older leaves can die, the color of the new ones is lighter than the old foliage, and the new growth is smaller than the last ones. The Hare's-tail grass indeed loves the sun so much. However, they can wilt when exposed to excessive heat and ultraviolet light during the extreme summer months, so be careful. You might want to cover them with a net that has a green shade, especially in the summer, to prevent the leaves and the flowers from scorching. When they are indoors, reduce the heat with the help of a fan.
![more]()
Does Hare's-tail grass need special care about sunlight during its different growth stages?
When the Hare's-tail grass is growing, they need more light than their mature counterparts. The younger ones should receive adequate light, but they might not be prepared for sudden full sunlight, especially if they are grown in a nursery. They can be more sensitive to the summer sun, so the lighting should be gradual and slow.
![more]()
How much light does Hare's-tail grass need for photosynthesis?
During summer or late spring, the Hare's-tail grass needs 6 to 8 hours of direct light every single day. This is whether they are planted outdoors. If the Hare's-tail grass is planted in pots or you're growing them in the winter, they need direct fluorescent lights that help them grow better. Make sure to place them in an indoor area where they are facing south or east so they can have enough sunlight for photosynthesis.
![more]()
Are there any cautions or tips for sunlight and Hare's-tail grass?
When transplanting the plants, they should not be exposed to sudden sunlight. Give the Hare's-tail grass to grow and mature before transplanting outside. Some species of herbaceous plants can grow taller and might cast a shade on other young plants. Allow between 80 to 100 days of growing season before planting another batch to ensure that every plant receives more than enough sunlight for at least 6 hours a day. Make sure that the Hare's-tail grass receives the best light possible, especially if it's planted in a nursery. These are sun-loving plants, but too much sunlight with a very hot temperature is also detrimental to their growth. Indoor lights should be replaced with natural sunlight as much as possible since these species crave this every day.
![more]()
What is the optimal temperature for Hare's-tail grass?
The best temperature for Hare's-tail grass depends on the time of year. There are two primary seasons to discuss for temperature: the growing season, and the dormancy season. During the growing season, once Hare's-tail grass has begun to sprout, the ideal temperature range should be anywhere from 65~80℉(18~27℃). Any colder than 15℉(-10℃), and the plant will suffer; its leaves may brown and wilt, but if this is a short cold snap, then Hare's-tail grass may be able to survive with some help. During the warmer parts of the year, Hare's-tail grass will need to be similarly protected from temperatures that are too high. 95-105℉ (35-40℃) is the top of this plant’s temperature range, and anything above that will compromise the integrity of the foliage and blooms of Hare's-tail grass. Hotter temperatures can cause wilting, drooping, and even sunburn on the leaves, which can be difficult for Hare's-tail grass to recover from. There are quite a few ways to combat this issue that are quick and easy!
![more]()
Temperature requirements for first year or seedling Hare's-tail grass
If this is the first year of your Hare's-tail grass outside as a new plant, then it may need a little extra tending during the coldest months of the year. Not only can frost more severely damage a first-year Hare's-tail grass, but it can also prevent it from growing back as a healthy plant come spring. This plant needs to be kept at 40℉(5℃) or above when they’re not yet established, which can be done either by bringing your Hare's-tail grass inside for a month or two, or putting up mulch or fabric barriers that protect from frost damage. It’s also a good idea to plant Hare's-tail grass in a shadier spot during the first year or two, as smaller and weaker plants have a more difficult time maintaining their own temperatures in the heat. First-year Hare's-tail grass should receive no more than five hours of direct sunlight per day, particularly if the ambient daytime temperature gets above 80℉(27℃). Shadecloth and frequent watering or misting are the keys to summer heat control.
![more]()
How can I protect Hare's-tail grass from extreme temperatures?
If cold temperatures (below 15℉(-10℃)) do occur during the growing season, there are a few measures you can take to help protect Hare's-tail grass from frost or cold damage. If you’re growing Hare's-tail grass in a container, then the container can simply be brought inside in bright, indirect light until the temperatures rise up over the lower threshold again. Another option that’s better suited for ground-planted Hare's-tail grass is to use mulch or horticultural fabric to create an insulated barrier around the plant, which will protect the plant from frost and cold wind. For temperatures that are hotter than 80℉(27℃) in the shade during the day, be careful to only expose Hare's-tail grass to six hours or less of sunlight per day, preferably in the morning hours. Putting up shade cloth, or a fine plastic mesh, can help reduce the amount of direct sunlight that hits the plant during the hottest parts of the day. You can also install a misting system that allows for a slow release of cooling mist around the base of the plant during the day to lower ground temperatures.
![more]()
Dormant season temperature recommendations for Hare's-tail grass
During the cold winter months, Hare's-tail grass needs a certain measure of cold in order to stay in dormancy until it’s time to sprout. Sprouting too early, that is before the danger of the last frost has passed, can be fatal to Hare's-tail grass, especially if it’s already had a head start when the frost hits. Winter temperatures should ideally stay below 32℉(0℃), but if they get up to 40℉(5℃), everything will be just fine. An unexpected warm spell during the cold months, which can happen in more temperate climates like woodland rainforests, can trigger a premature sprout from Hare's-tail grass. In this case, if there’s still imminent danger of frost, you may want to try covering it with clear plastic on stakes so that the cold has less of a chance of damaging the new sprout. This setup can be removed when the danger of frost has passed. Occasionally, Hare's-tail grass will be able to resprout at the correct time without any help, but this method increases the chances of a successful second sprouting.
![more]()