New perk! Get after it with local recommendations just for you. Discover nearby events, routes out your door, and hidden gems when you sign up for the Local Running Drop.
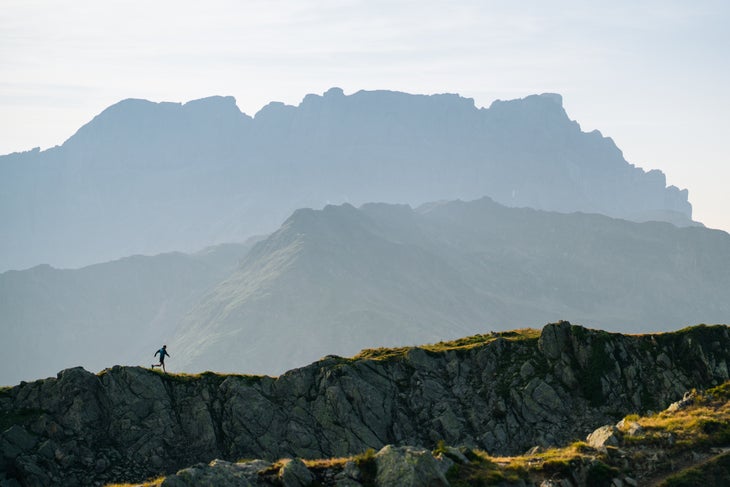
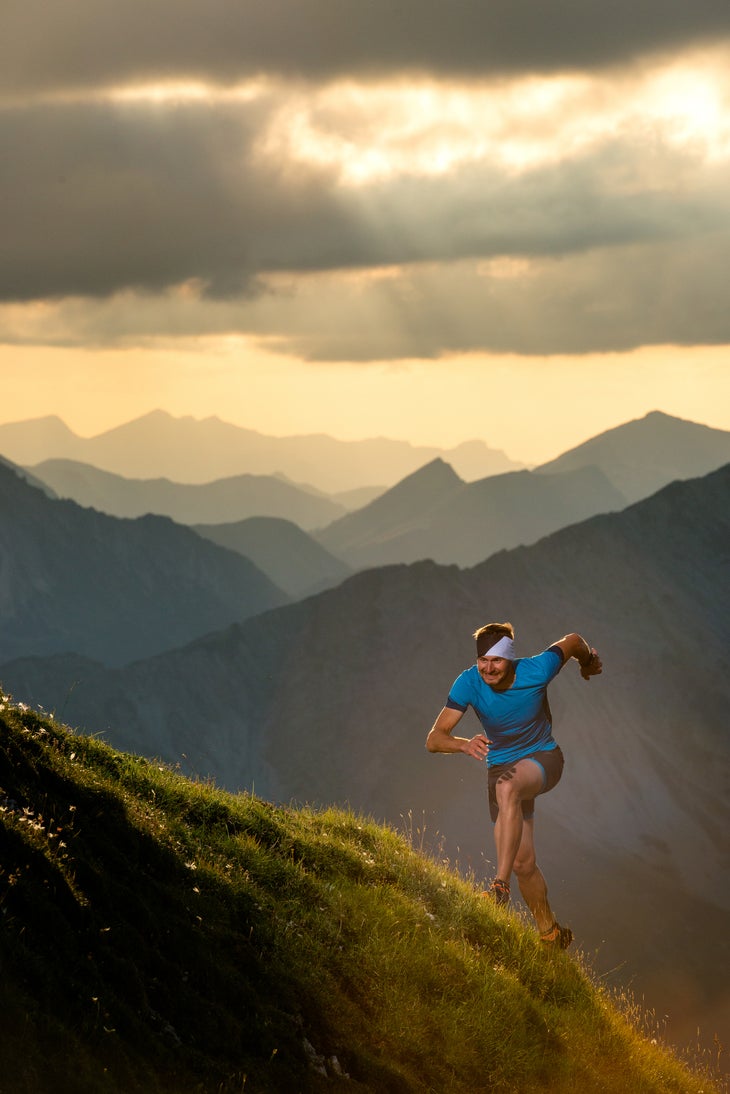
Trail running is all about the environment. When you have a dramatic landscape, make the most of it by shooting wide and minimizing the runner. When the backdrop is drab, shoot tight and emphasize the runner and action.
Somewhere along one of our trail runs we’ve all crested a stony ridge and been smacked in the face by a Kodachrome moment: a breathtaking panorama of rolling green meadows, azure sky and screaming yellow wildflowers. To immortalize the moment, we snap a photo and a couple of weeks later, eager to relive the experience, load it onto a computer. They say that time changes things, and this time it sure did. That magical moment looks fuzzy, dim and as unappealing as a warm mayo sandwich. What happened?
Read on and glean the photography secrets of the pros—guys like David Clifford—tips culled from experimentation, mistakes, getting lucky and actual book schooling. Photography is too vast and tricky a subject to detail in a few thousand words, so think of this as a primer, the starting point for your trail-running photography ultra.
Here’s how to take better trail running photos.
What Photography Gear You Want For Good Photos
You can trail run in army boots, and you can photograph trail running with a disposable camera. But, if you want to actually enjoy the experience and nail quality shots, specialized gear is a must. You need a camera with interchangeable lenses, manual adjustments for the shutter, aperture and ISO, and a continuous-firing or “burst” mode that will let you take multiple photos per second, increasing your chances of getting the shot where the runner’s stride is picture perfect. The higher a camera’s burst rate, the better: nine frames per second great; four per sec is just passable.
A few of the better point-and-shoots have most of the features you’ll need, and high-end point-and-shoots can be better than low-end digital-single-lens-reflex (DSLR) cameras. Lightweight, small, simple to use and relatively inexpensive, point-and-shoots are ideal for getting shots to post online, show at slideshows or make prints for mom. For pro photography, however, they fall short in too many areas.
If you want to sell your photos or do pro-caliber work, the lens-changing ability of a DSLR makes it a must. There are dozens of great models by companies such as Canon and Nikon, but, fundamentally, they are similar and have many of the same features. I shop by price and megapixels, the smallest bit of information a camera can capture—more megapixels equals better photos. To print a sharp photo in a classy mag like Trail Runner you need a camera that will take photos of 10 megapixels, minimum. This resolution allows us to print the photo as a full page and gives the art director cropping options. Most top-tier cameras deliver this resolution—some even double it. Images around eight megapixels are common for today’s point-and-shoots, although 10 megapixels is becoming more common.
Besides choosing a camera with as many megapixels as you can afford, get one that uses quality lenses such as those from Canon or Nikon. Middling lenses by Tamron, Tokina, Sigma and the ilk cost a fraction as much, but can have disappointing optical qualities. To be sure, some off-brand lenses are very good, but you won’t know until you buy one and test it out. At Trail Runner, we see thousands of photos a year. The sharpest, best ones are always taken with a top-shelf lens. The website www.kenrockwell.com is loaded with solid camera and lens reviews.
If money is tight, look at inexpensive prime (non-zoom-length) lenses. If you can just buy one lens, get a 50mm f/1.4. That versatile lens from Canon or Nikon will be in the $300 to $350 range. Next, get either a 12mm or 24mm. One of these wide angles will let you get close and personal with the runner, while including the sweeping landscape.
As budget allows, add a medium telephoto such as a 85mm or 105mm. With all lenses, buy the lowest aperture you can afford. For instance, choose the 50mm f/1.4 over the 50mm f/1.8. The “faster” f/1.4 will cost over twice as much, but because it can shoot in lower light, will occasionally let you get a pic that’s impossible with the f/1.8. More importantly, it has a much shallower depth of field when it is shot wide open, letting you blur out a distracting background or foreground (more on depth of field later).
RAW POWER
Digital cameras have a confusing display of settings that can make the cockpit of a passenger jet seem like a deprivation tank. Most vexing are the Image Quality options. Almost all DSLRs and some point-and-shoots give you the option of shooting JPEG (low quality), JPEG fine (medium quality) or RAW (maximum quality). RAW captures the most data and delivers an undoctored image, one that has not been adjusted in-camera for sharpness, contrast or other settings, hence the term “raw.” A RAW photo has to be processed for color, sharpness, etc., back at the house, and on your computer, which takes time. But since your computer is more powerful than the processor in your camera, your options for making adjustments are nearly unlimited. Disadvantages: RAW photos gobble up card space and are slow to load on a computer.
Most of that post-production work goes out the window if you take JPEGs. Then, your camera’s processor makes the adjustments to spiff up the image. Usually, your camera will do a good job of processing JPEGs, and if you don’t know what you are doing in Photoshop, a processed RAW file can actually look worse than a JPEG. Most of the better cameras let you shoot in RAW and JPEG format at the same time. If you are sending your images out for consideration in print, include the JPEGs—many photo editors prefer to preview photos in JPEG, but only accept hi-resolution RAW images for publication. Check before you send. Trail Runner prefers high-res tiffs converted from RAW with low-res JPEGs for previewing. If you don’t care to market your photos commercially, shooting JPEG is fine.
SHOOT SHARP
Running photography is an action sport—your subject is always moving, making it easy to miss the focus and get a blurry or “soft” image. Soft photos are caused by using a shutter speed that is too slow to freeze the action and/or blowing the focus.
To freeze action, a shutter speed of 1/320th of a second is the lowest you can go, and even then you’ll get more blurry than crisp shots. Eliminate motion blur by shooting with a shutter speed of 1/400th or faster.
GET FOCUSED
Focus problems are second only to shutter speed as the cause of blurred running shots. When someone is running, the point of focus relative to your camera constantly changes. What is in-focus one instant is out-of-focus the next. There are, however, tricks you can use to increase your chances of nailing a sharp pic. Having your runner run parallel to you instead of at you, for instance, will keep the runner in the focus plane longer. If the runner is going to be coming at you, pre-focus on a spot on the trail. Pick a pebble on the trail at a place where you like the composition, focus on that pebble, compose, then start shooting right before the runner arrives at the pebble. Continue shooting until the runner is past the pebble. Set the camera on burst so it will fire multiple frames per second, increasing your chances of getting an in-focus shot.
Another tip for nailing focus is to adjust your lens aperture to give you a deep depth of field, the invisible box inside which everything in your photo will be in-focus and everything not in the box is out-of-focus. If the light is bright enough, do this by adjusting your aperture, or “f-stop,” to a higher number (called “stopping down”), say f/16 instead of f/2.8. The larger the aperture number, the deeper the depth of field, and the more likely you’ll get your subject in-focus. The trade off is that when you shoot with a large aperture, much of what you see through the viewfinder will be in-focus and you lose that blurred painterly feel where those flowers in the foreground or peaks in the background are softly out-of-focus.
The lens you stick onto your camera will also affect sharpness. Wide-angle lenses, those from 10mm to 24mm, are very forgiving of focus error, and because they are small and lightweight, are easy to hold so you are less likely to get blur caused by camera shake. Big, heavy lenses such as a 200mm or 300mm, on the other hand, are unforgiving. They demand precise focusing when you shoot at the lower apertures and are tiring to hold, making it more likely you’ll jiggle the camera and blur the photo. A tripod or monopod will help you steady a camera with a big heavy lens, but setting up a tripod eliminates spontaneity and reduces your ability to change composition on the fly. When you are getting started, you’ll have the best luck shooting with lenses in the 12mm to 105mm range. Happily, these lenses are also usually the least expensive.
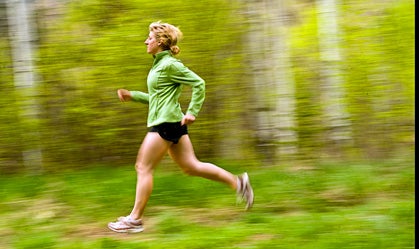
Runner: Ashey Arnold. Location: Redstone, Colorado.
>>This runner’s face and part of her shirt are sharp, while the rest of the image blurs by, giving the photo a sense of movement. This was achieved using a “pan blur,” with the shutter set on just 1/30th of a second. The photographer tracked the runner as she zipped by and a wide 50mm lens stopped way down to f/16 minimized focus error. Still, it took about a dozen takes to get this shot.<<
COMPOSITION__Trail-running photography lends itself to panoramic horizontal compositions, where you get the nice green vegetation in the foreground, blue sky or mountains in the background and the runner somewhere in the middle, usually running left to right, and slightly toward the camera. Easy. But, study the photos by greats such as Clifford and Dan Patitucci and you’ll note that (usually) either the foreground or background or both are intentionally softly out-of-focus, while the runner is tack sharp. Photos such as these isolate the runner, drawing your eye to the action, which is the ultimate goal. As mentioned earlier, use your camera’s aperture to set a depth of field that puts the runner in-focus and other parts of the photo out-of-focus. The aperture adjustment will vary wildly depending on your lens—take the same photo with the aperture all the way open, then fully stopped down and watch the depth of field change.
To shoot like a pro you will have to move around. Most shooters, for simple lack of knowing better, just stand flat footed facing the runner and bang away. For sure, you can get great images this way, but this standard, eye-level perspective gets boring quickly. Find a unique perspective by climbing a tree, standing on a boulder, lying on your back or shooting from a higher or lower vantage point. The extra effort will give your shots a unique look that elevates them above the drudge.
We get thousands of great photos and many of them look the same. Same-size runner, same lens, same light, same perspective and even the same runners. It’s like watching replays of the Olympic marathon over and over. Make it a habit to often switch out lenses and constantly be on the move. For instance, lie on your back and shoot up with a wide-angle lens, then switch to a 200mm lens and shoot the runner from a distance in profile, with the lens opened to f/2.8. Same runner, same trail, but wildly different perspectives.
OBEY THE RULE OF THIRDS
Centering your subject is visual suicide for photography. Strive for a pleasant, balanced photo by dividing your viewfinder into thirds vertically and horizontally and placing your subject in a quadrant that isn’t centered. If you are shooting a horizontal landscape, for example, make the top horizontal one third of the image the sky and the bottom two-thirds the land, or vice versa if the clouds are more interesting.
SHOOT THE FACE
Imagine Mona Lisa. Now imagine that instead of coyly smiling at you, she is looking away. Facial expressions convey information and add drama, while seeing someone’s eyes engages you. Add these personal elements to your photos and avoid shots where the runner is running away.
Shooting the face isn’t easy. Most people run with their faces screwed up into an unflattering wince or have their eyes squinted nearly shut or have their mouths agape. Turn on your camera’s burst mode—digital frames are free—and you’ll increase your chances of getting the right expression. Be sure to focus so you get the eyes sharp, and, unless you are capturing your subject running out of a bank, never let him wear sunglasses.
RIGHT STRIDE
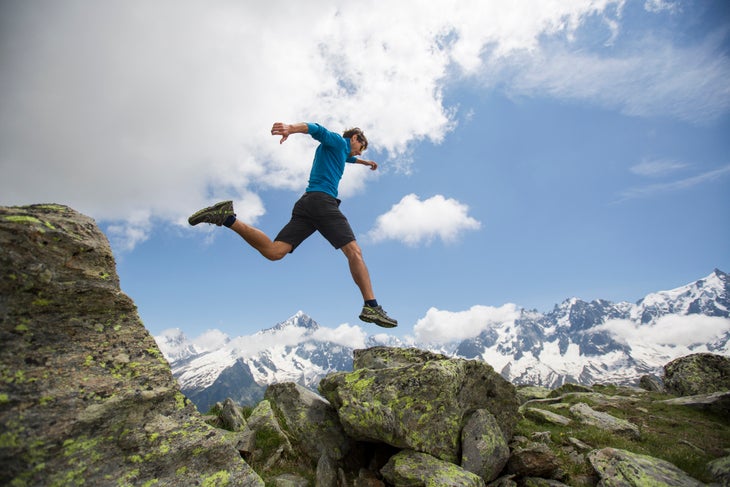
Great running photography is all about stride, capturing the instant when at least one (ideally both) of the runner’s feet are in the air. Having the lead foot just beginning to touch down or push off also works well. What doesn’t work is having both feet down or the lead foot all the way down, where the runner seems anchored to the turf and usually hunched. Hand position is also critical. You want the hands relaxed rather than clinched; think of holding a potato chip between your thumb and forefinger.
Getting the hands and stride right takes timing and instruction—tell your runners what you want. Set your camera to burst (just keep it there, always!), pre-focus and, usually, you’ll still have to ask the runner to do it again and again.
Photographing one runner simplifies the work. If you are shooting two or more runners, the problems compound exponentially—it’s tough to snap that pic where everyone is simultaneously in a nice stride with pleasing facial expressions. Asking them both to begin running at the same time, and off the same foot will increase your chances. Naturally, if you are shooting a race you’ll have to take what you get.
When someone is running straight at you, you’ll often get the undesirable “peg leg,” effect, where one foot is kicked high and obscured by the runner’s thigh, making that leg appear as if it was bitten off at the knee. Positioning yourself so the runner is slightly in profile will eliminate peg legs.
MOTION BLUR
Images where the runner is blurred and the background and foreground aren’t, or where the runner is sharp against blurred surroundings, convey action, and make them stand out. You don’t see many shots like these because they are tough to get just right. To blur running action, you’ll need to shoot around 1/30th of a second. Camera shake is a problem and will ruin most of your images. A tripod can help, but usually you’ll be shooting on the fly and won’t have one. Steady yourself by bracing against a tree and keep your elbows tight to your sides. To blur the runner, adjust the shutter to 1/30th and press the shutter (set on burst) as he goes by. If you hold it steady, you might have an interesting photo.
The better, more difficult pic to get is to “pan” your camera to track the runner. This will blur the surroundings and freeze the runner’s action. To pan, keep the runner centered in the viewfinder (break the rule of thirds) and track him as you hold the shutter down. Moving the camera and yourself at a steady pace that matches that of the runner requires practice, lots of it. Again, keep your elbows pressed in and concentrate on only moving the camera laterally, not up and down. Using a wide-angle lens such as 24mm will make it easier to follow the runner and will reduce camera shake.
Don’t get discouraged if you do everything right and still get a blurry photo. When most people run, their arms and legs are churning, yet their torsos and heads aren’t—you get the head sharp but the rest of the body is blurred. Finding that middle ground where you have some sharpness in the action is the trick that takes timing, practice and luck.
CLEAN THE CLUTTER
Junky photos with power lines, gear strewn on the ground and other visual detritus don’t hack it. Eliminate clutter and you’ll draw the viewer’s eye to your subject, which is the point of shooting in the first place. Usually, this is as simple as looking through the viewfinder, recognizing clutter and adjusting your position or composition to crop it out. Or, it can be as difficult as shooting at a shallow depth of field with a medium-length lens, say an 80mm at f/2.8 and blurring out the background and/or foreground. Some of the junk can be cloned out in Photoshop, but it’s best to get it right to begin with.
DON THE DUDS
Runners love to show off their glistening pecs, but pearly white skin against a stunning backdrop is unappetizing. Make your runners pop by dressing them in bright, contrasting shirts and shorts. Light blue, red and yellow stand out in almost all situations. Keep clothing of each color in your pack and force feed it to your subjects. White garb can work, but brown, grey, black and all natural tones are often duds. Colorful knit caps add another good color splash, but brimmed caps shade the eyes—don’t allow them.
NAP AT NOON
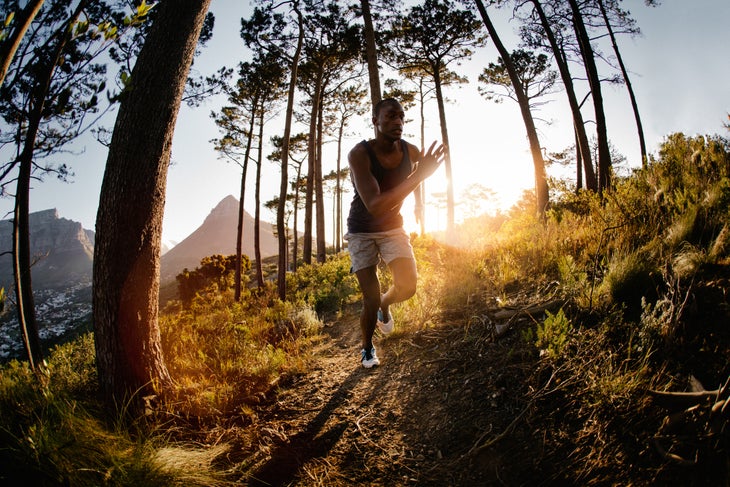
Amateur (and lazy professional) photographers shoot midday, when the sun is highest and the light is brightest. Unless you have overcast skies to soften the light and bring out the colors, you are wasting your time. Bright sunlight washes out colors and produces harsh, distracting shadows—especially on faces. Shoot at sunrise and sunset, when the low slant of light brings out the colors and adds a nice golden hue. However, don’t just shoot at these hours. The couple of hours after sunrise and before sunset can be great as well, and photos taken in full but bright shade, say on the northern side of a hill, can be snappy.
ARTIFICIAL LIGHTING
Using an on-camera fill flash spells death to any photo. They just look fake and, since most cameras will shoot at the fastest at 1/250th of a second shutter speed, shots taken with your camera’s flash are destined to be blurry.
RUTHLESSLY EDIT
Ripping off a thousand digi images is one thing, but then what? Edit, baby, edit. View your work on your camera display and delete the ones that are obviously junk. Copy the survivors to your computer, then view them in JPEG mode. Photo-management software such as Lightroom 2 or Photo Mechanic are great tools.
Once you have your photos selected, it’s time to dress them up in post-production software such as Photoshop. Go hog wild if the photos are for your own use, but use a light touch if you are sending them to a publisher. Editors prefer to do the color correcting and sharpening themselves, as they are familiar with their printing process and paper. And their monitor is calibrated to SWOP print standards, while yours likely isn’t, meaning the colors you behold are different from the ones an editor will see. Some basic capture sharpening and color correction is fine, but leave the big strokes for an editor. Be sure to include your name and caption info in metadata for each photo.
NOW, FORGET EVERYTHING
The works of abstract and impressionist painters may look like a child’s hand painting, but if you ever look at these master’s early works you’ll realize that they learned the rules, then chose to break them. Photography is the same way. Get a solid foundation by knowing how you are supposed to do it, then do it your way. Anyone can press a camera’s button and adhere to the rule of thirds, but only a true artist can bring a vision to life.